
When I first moved in (see EC move-in), a friend already bought carpentry directly from China. He did it through a freelance designer — however that guy was no longer operating. I went to his place several times and he's also raving about it. No doubt the quality is amazingly good. So for this remodel this time, I wanted to have my carpentry done in China.
Why China carpentry
I was very clear I wanted to do carpentry from China for several reasons:
- The quality is really good. Having my TV console breaking a little after 1 year plus, I have not much faith locally.
- It's formaldehyde free. That glue thing is unbearable — I already learned that the hard way in my HDB reno.
- Price, of course.
Sourcing and landing on Carpenter A
So we started sourcing around. Actually there's tons now locally. Since I didn't have a contact, we thought to do it locally.
Asked a few but landed on one of them. Let's call them Carpenter A.
Wet works — not in their scope
These China-made custom carpentry companies don't do wet works. They actually partner with other companies to do those. Wet works here refers to hacking, plumbing, painting, and so on — anything that isn't in the scope of carpentry.
Convenience is expensive
We went with the wet works company they recommended. Reason being, we were under the impression they work together and can solve things together. We thought we could be slightly more hands-off — that they could liaise among themselves.
Huge mistake. Remember, convenience is extremely expensive in this industry.
Deposit to kick things off
To kickstart, we paid a 10% down payment to Carpenter A amounting to $3k. Our quote was around $30k for the works we wanted to carry out. We also paid a deposit to the wet works team — leaving the company out here, because I don't think they deserve any visibility.
Scope of works
My scope consisted of the following:
- Hacking down one of the bedrooms
- Hacking down the wall between kitchen and living
- Build up walls to change the entrance of the kitchen
- Electrical works (initially wanted to get the wet works guy to do it)
- Painting (also planned to have the wet works team do it)
- Shifting of gas pipe
- False ceiling works done by the wet works team
- Plumbing done by the wet works team
- Carpentry works done by Carpenter A
The group chat and first measurement
Soon, there was a group chat created. Carpenter A's designer was in. The wet works team was in. Slowly the person measuring from Carpenter A was added, and they also arranged an appointment with me to come down and do the measurement.
That guy brought along an industrial-grade Leica scanner, and the measurement took around an hour. This was to get the initial rough measurement of the place to start the modeling in 3D.
What Carpenter A covers
Just to be clear about the scope, Carpenter A's scope involves measuring, fabricating the carpentry, shipping and delivering, and installation. They also do the design of your place.
First 3D render
From taking the first measurement to the 1st 3D rendering took about 8 to 10 days. Another designer was added to the WhatsApp group. I could sense it's a junior designer, because she was taking instructions from the designer we met in the showroom. I'm assuming it's a lady because the avatar shows a female — though it looked like some AI-generated avatar.
Upfront I'd already told them I have a bunch of huge items that need storage space — like my ladder, dehumidifier, Rainbow vacuum, Dyson vacuum, and Tineco wet dry vacuum.
Right now in the group, we have the following parties:
- Myself
- My wife
- Carpenter A senior designer based in SG
- Carpenter A junior designer based in China
- Carpenter A measure guy based in SG
- Wet works team — 2 of them in the group
It was early May 2026 when the first 3D render was out. Our planned renovation starts early June. So from then until early June, we needed to iron out what is needed before it can go into fabrication.
Iterating on the 3D render
As the days progressed, there was plenty of back and forth to iterate on the 3D render — discussions about how to store stuff, kitchen layout amendments, and so on.
Initially we wanted to do a gas dryer and stack it on top of the normal washer. Soon we realized that a gas dryer requires proper venting. So we tried to place the washer / dryer next to the window. However, after some checks, we couldn't vent it through the window as it's against the condo regulations. After knowing that could not be done, we had to tweak the kitchen layout again.
An inefficient feedback loop
At this point, the person responsible for the 3D design is the junior designer based in China. Throughout the progress, there were often empty promises about having the 3D render ready on a certain date, only to delay it by another day or two. We often had to chase several times to get an update. The feedback loop is really inefficient. And I thought since we engaged a company locally, the support would be better. Doesn't seem to be that way.
Though they are in charge of design, it seemed more like they are just taking in instructions without thinking through what issues it might cause — e.g. blockage of natural light.
The wet works team, although in the group chat, doesn't seem to be reading all the messages. So the initial thought that they will work closely together with little intervention from us are just wishful thinking. Sometimes a simple question has no reply for 1–2 days until a reminder comes in, then they step it up.
Overall it just felt unpleasant.
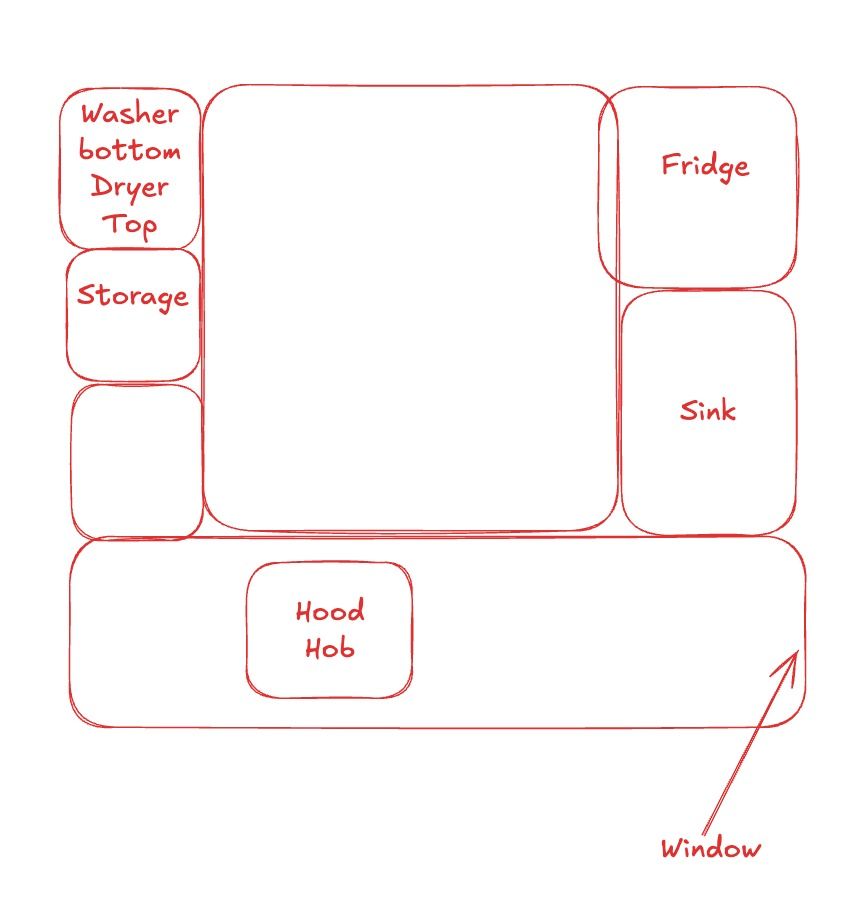
Kitchen layout — done myself
The kitchen layout ended up being created by myself, with a mock-up done in Excalidraw.
Mid May — another party joins
Mid May — another party from Carpenter A was added to the group. However, just camping in the group. No introduction as well.
Preparing for iCondo submission for reno permit
As our unit has hacking involved, we need PE (Professional Engineer) endorsement. This was initially provided by the wet works team. However something strange here — we were asked to PayNow to the individual from the wet works team and she said she will pay the PE. We aren't quite comfortable with that, so we ended up sourcing for one ourselves.
Professional Engineer endorsement
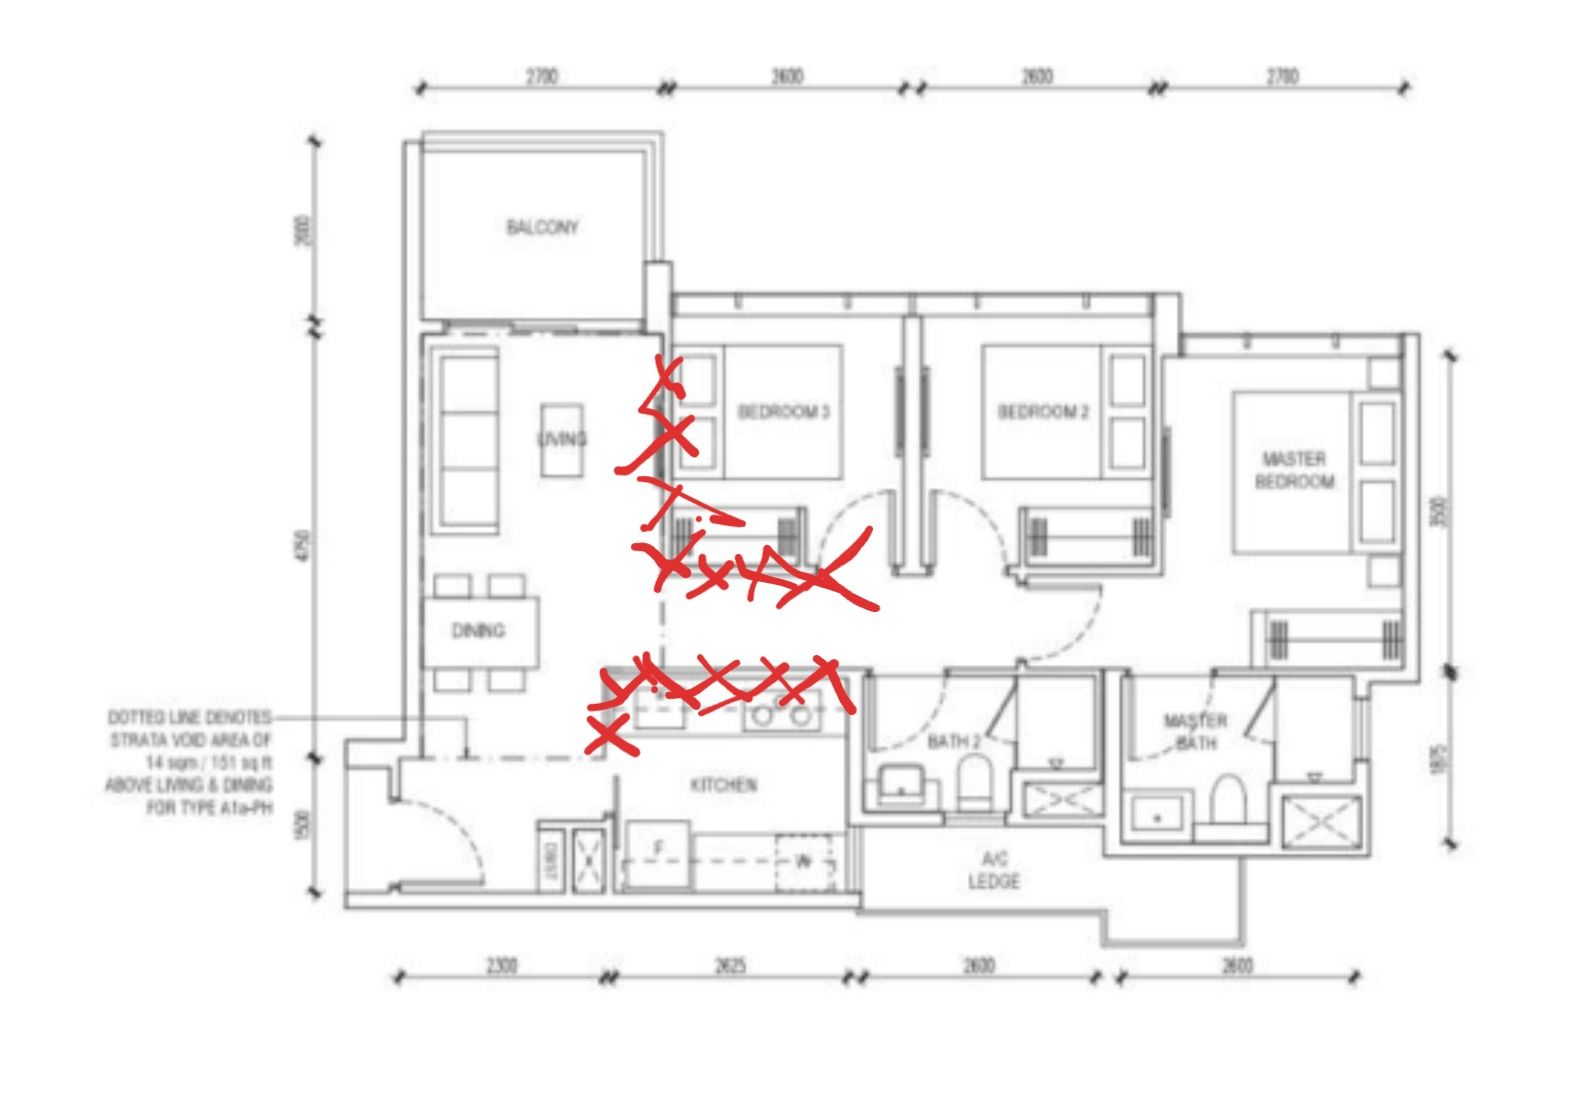
This is pretty straightforward. Annotate on the floor plan which walls are going to be hacked away. I just screenshot the floor plan, paste it onto Excalidraw, then annotate which is going to be hacked away. Send that over to the PE. Send over the payment via PayNow. I received the invoice and also the certification.
iCondo submission
We need to submit our layout plan along with the PE certification to MCST and apply for permit through the iCondo app. The layout plan was provided by the wet works team. This portion is pretty straightforward. The MCST reached out with some clarifications; shortly after, it was approved. Then they started to blast notices on the lift and also through the iCondo app.
Renovation begins
Renovation was scheduled to start 1 June 2026 and hacking was scheduled on 4 June 2026 and 5 June 2026. MCST usually require the renovation party to lay protection for the lift and common area. This is pretty common for condos. Most experienced contractors know what to do with this, as any damages will be held against us and the contractor.
Hacking starts
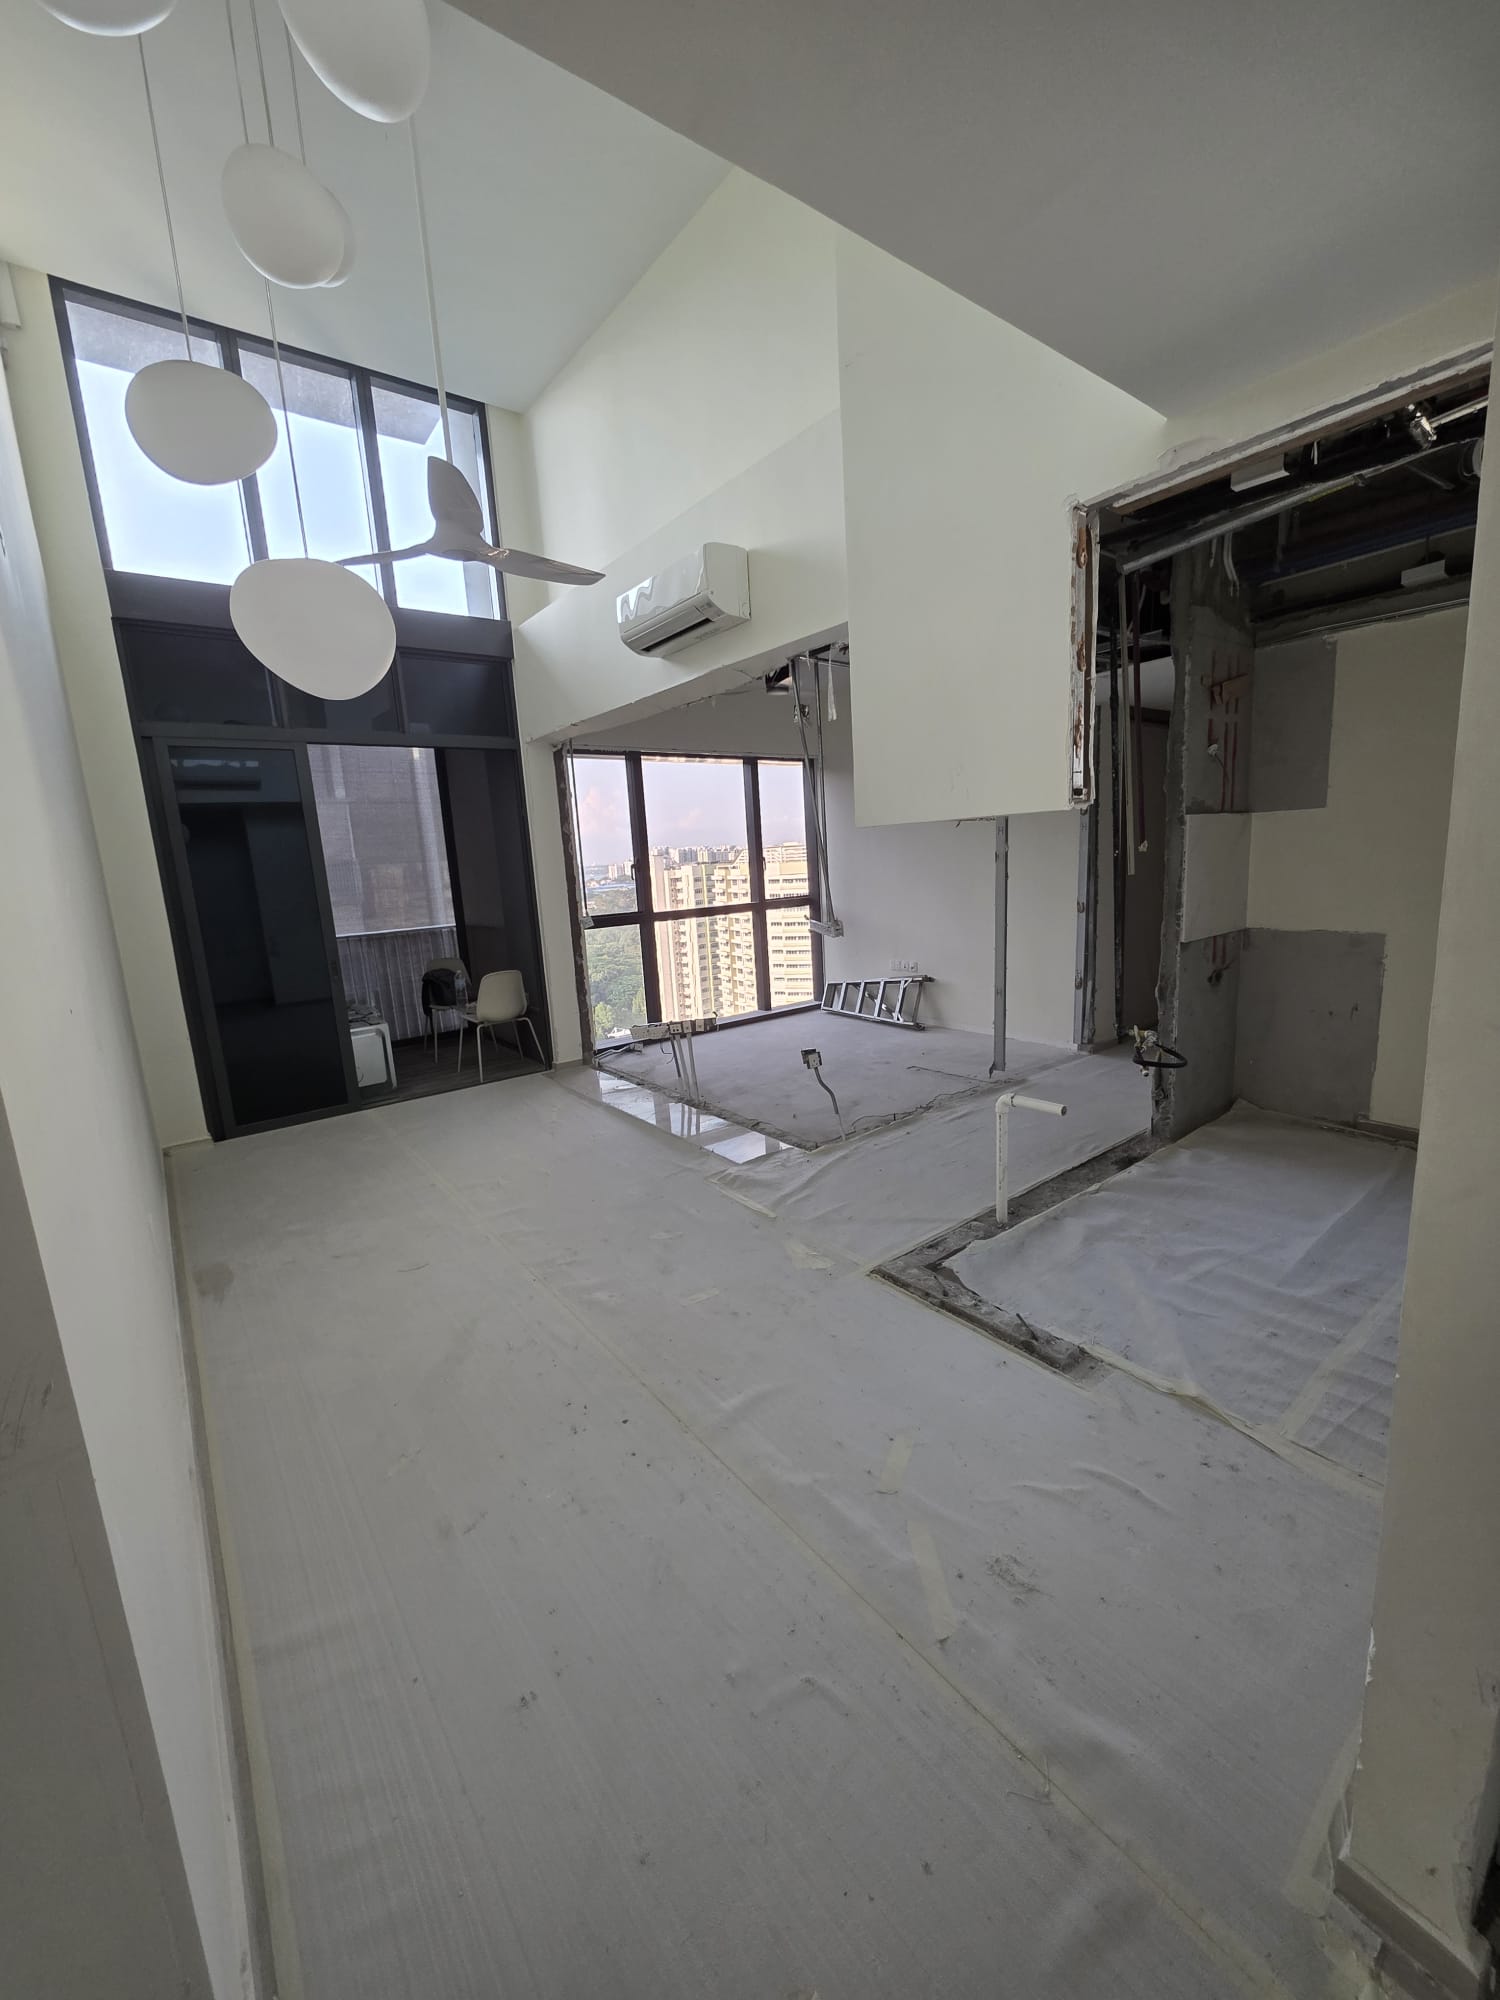
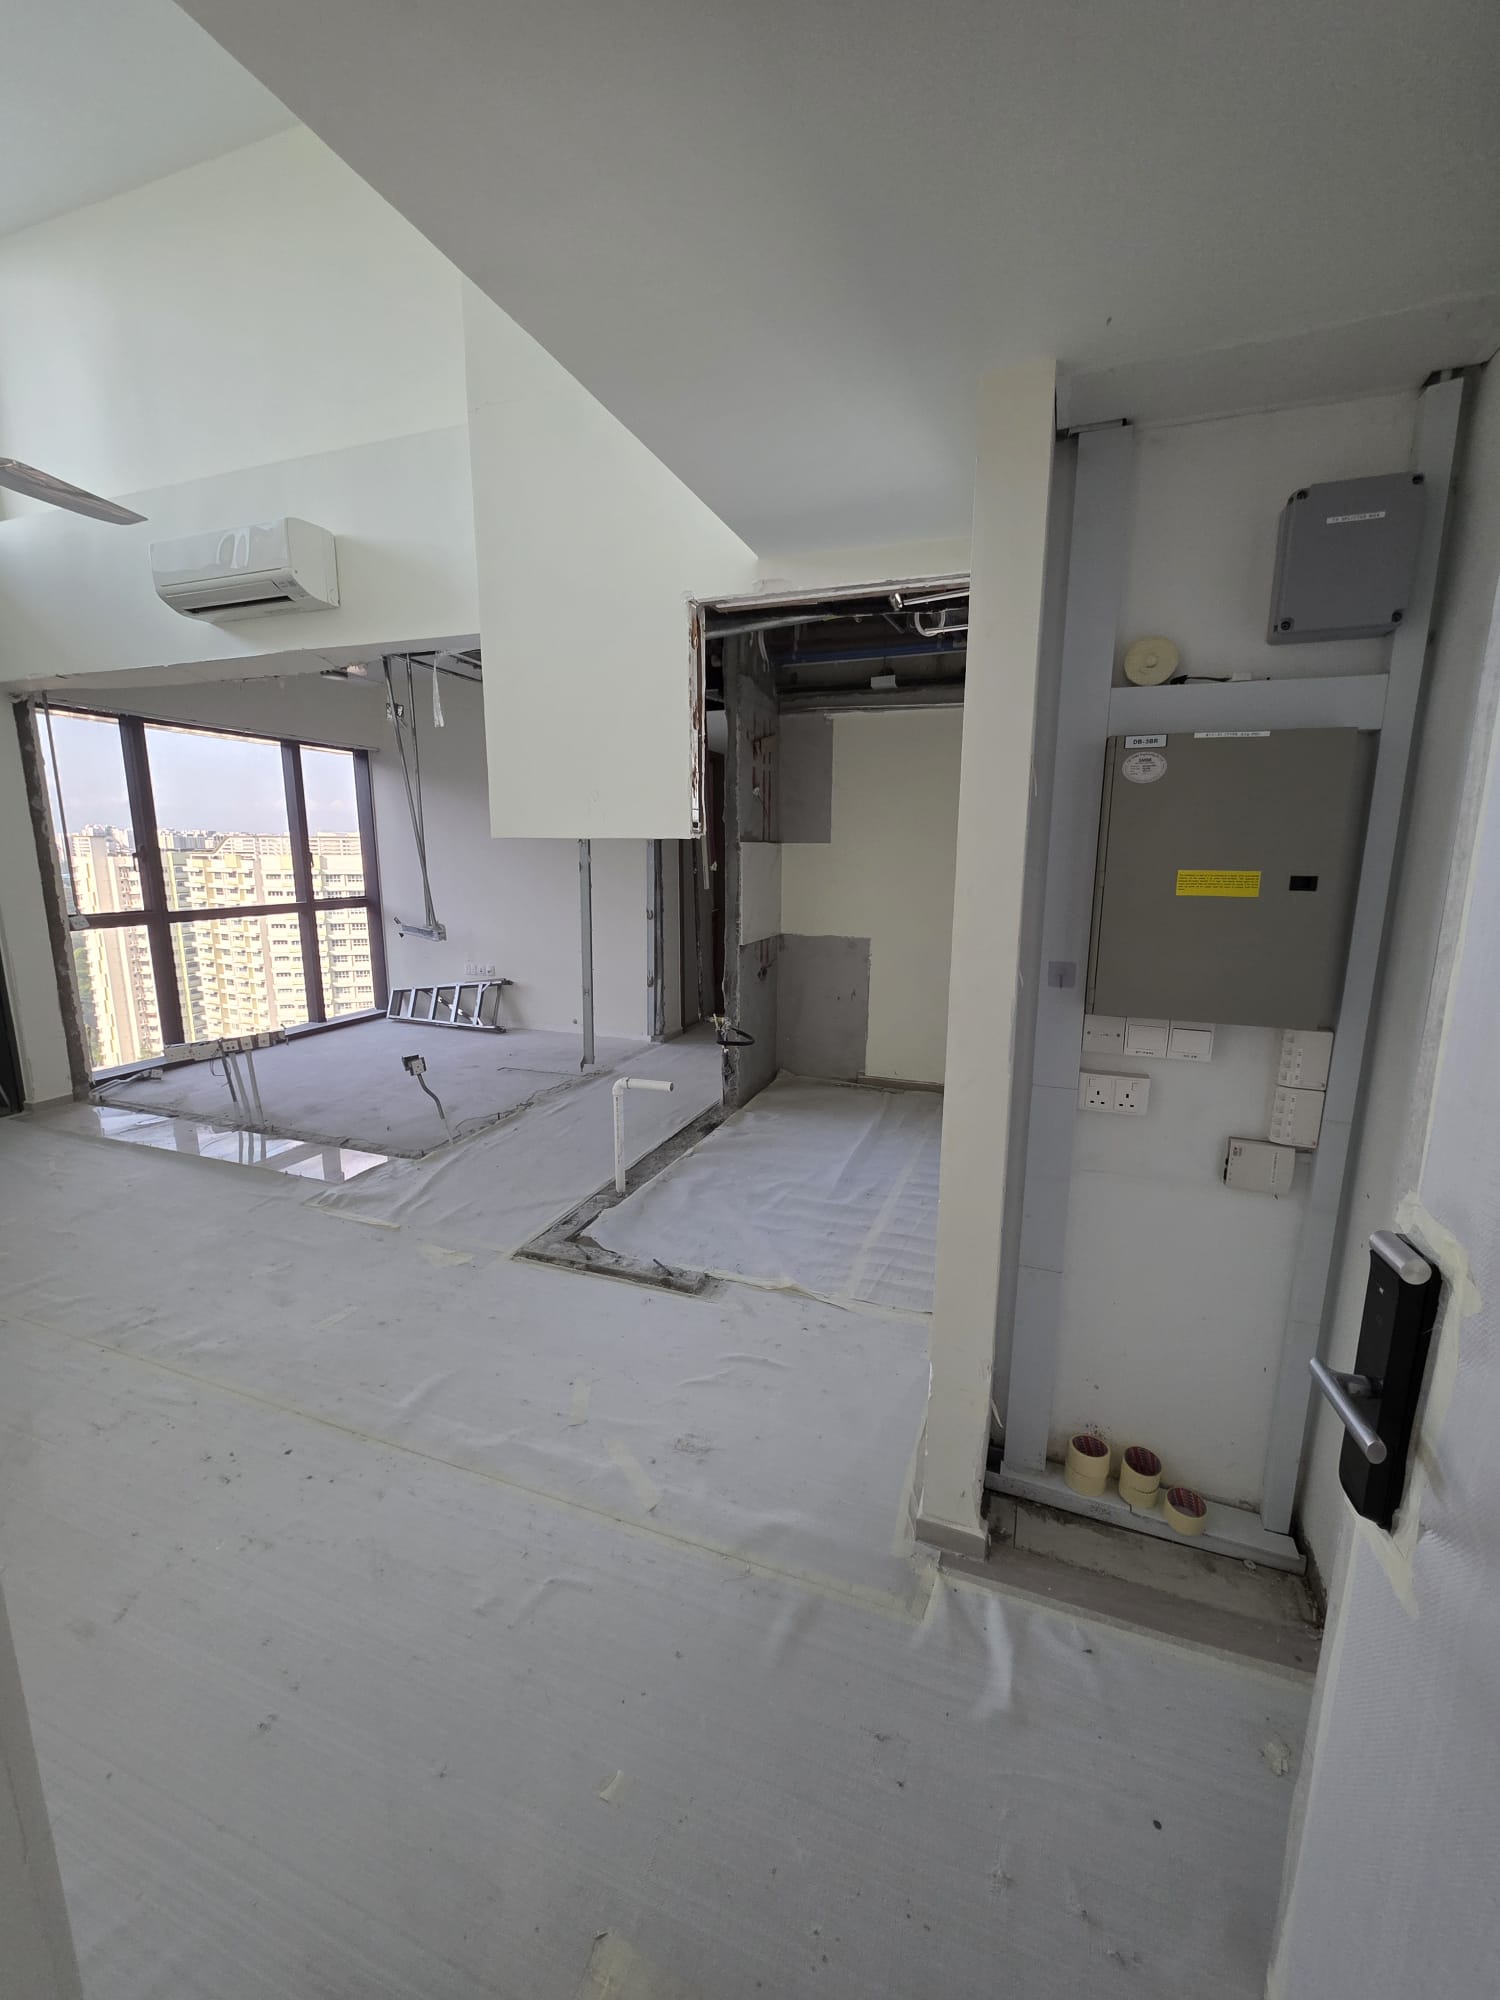
In 2 days, all the required walls to be hacked are down. Things going as planned.
Measurement again
Carpenter A's measurement guy was asked to do another scan after the walls are down, to capture an even more accurate state.
Another designer joins
After the measurement, another designer was added to the group chat. Now asking for electrical appliances measurement — such as fridge, washing machine, oven, kitchen sink, hood, hob, etc. This is the reason why I share in the tips to take down all these measurements where possible. Good to know what appliances to get in advance. Especially hood, hob and oven given that these are usually integrated into the carpentry so need exact measurement. For appliances on counter top like airfryer, maybe not so crucial. Still good to have all these measurements.
Selection of materials
Somewhere mid June, we also went down to the showroom to select materials — colour of the material for the cabinet, and countertop material etc.
Detailed drawing
Mid June, we received the detailed drawing. Basically it shows the detailed drawing in cm/mm for all the scope we discussed. These are couple of samples.
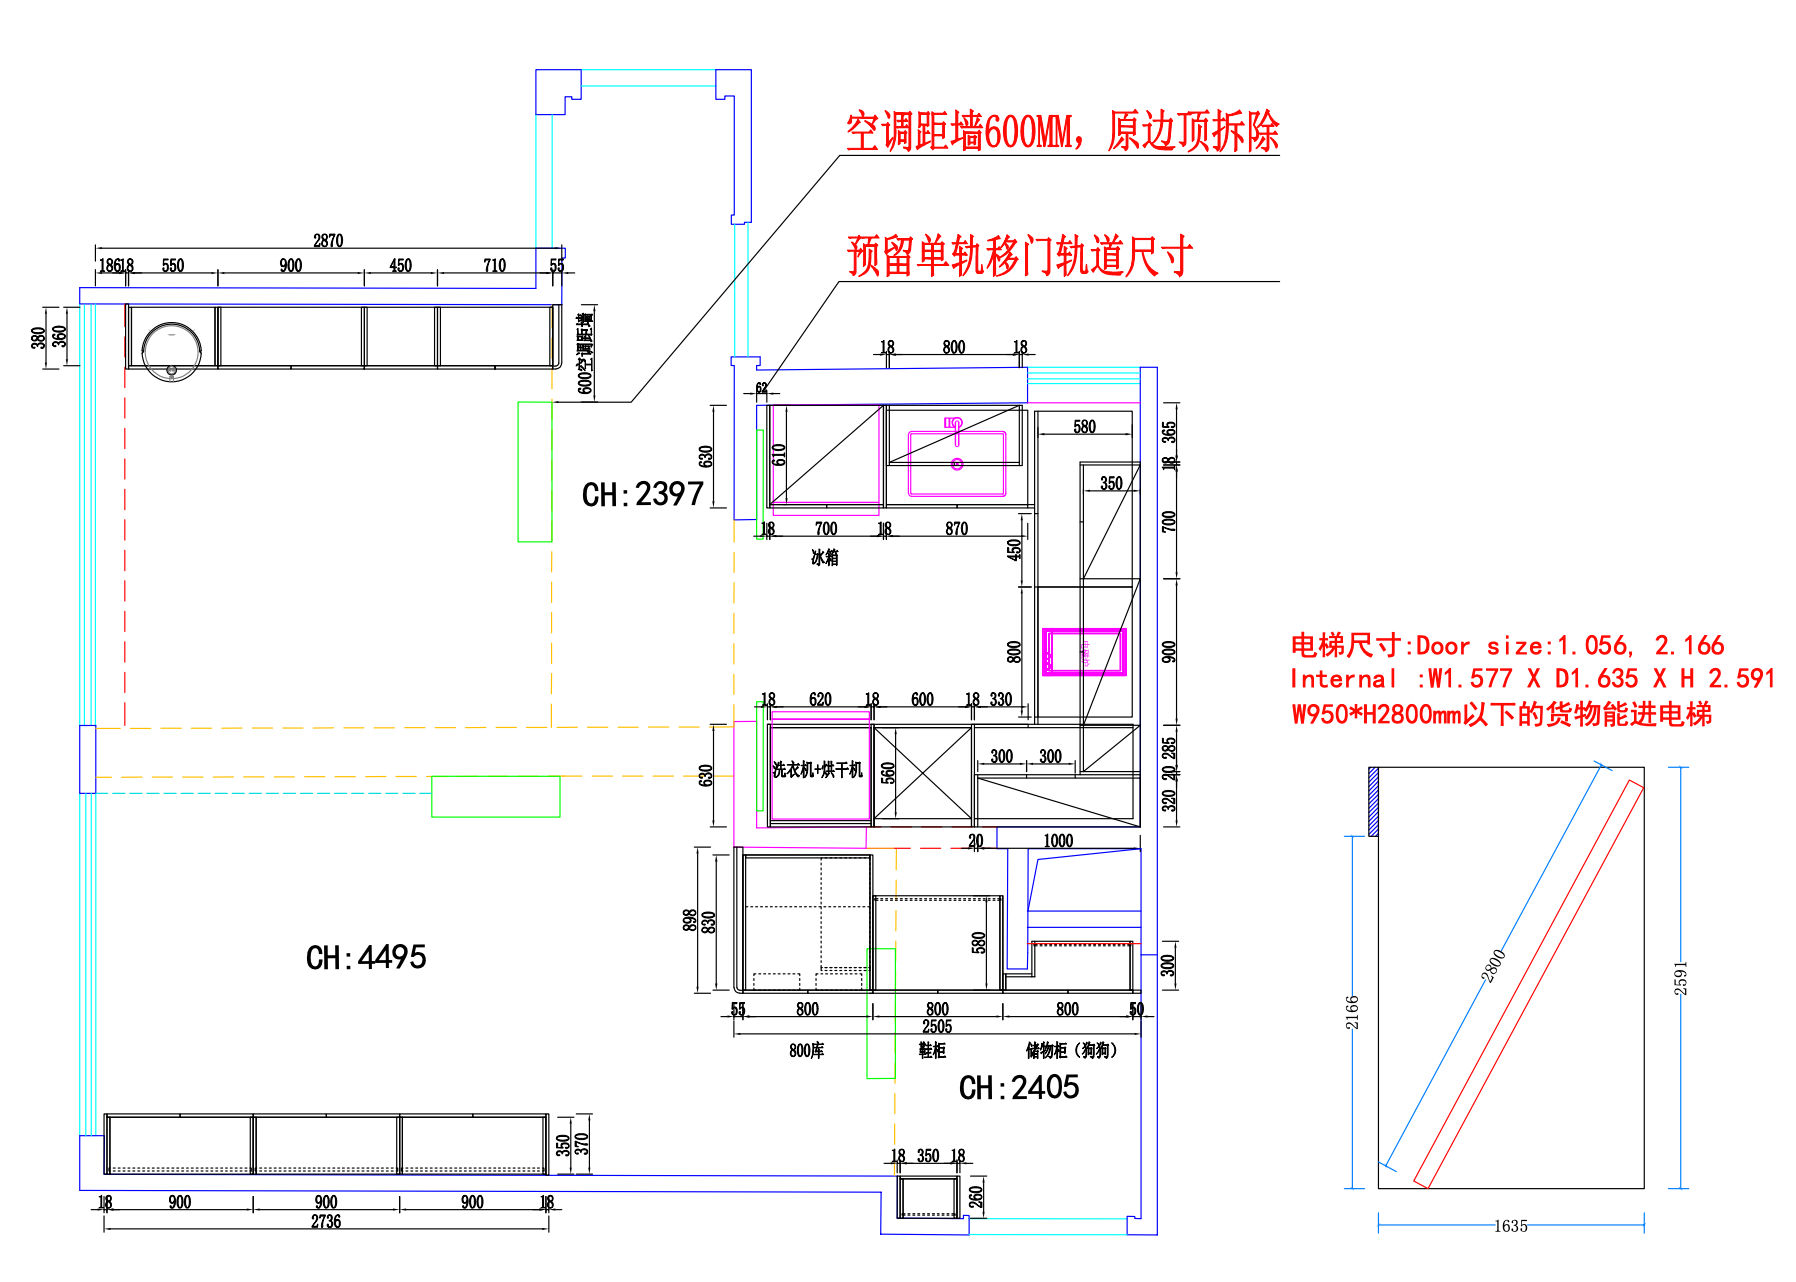
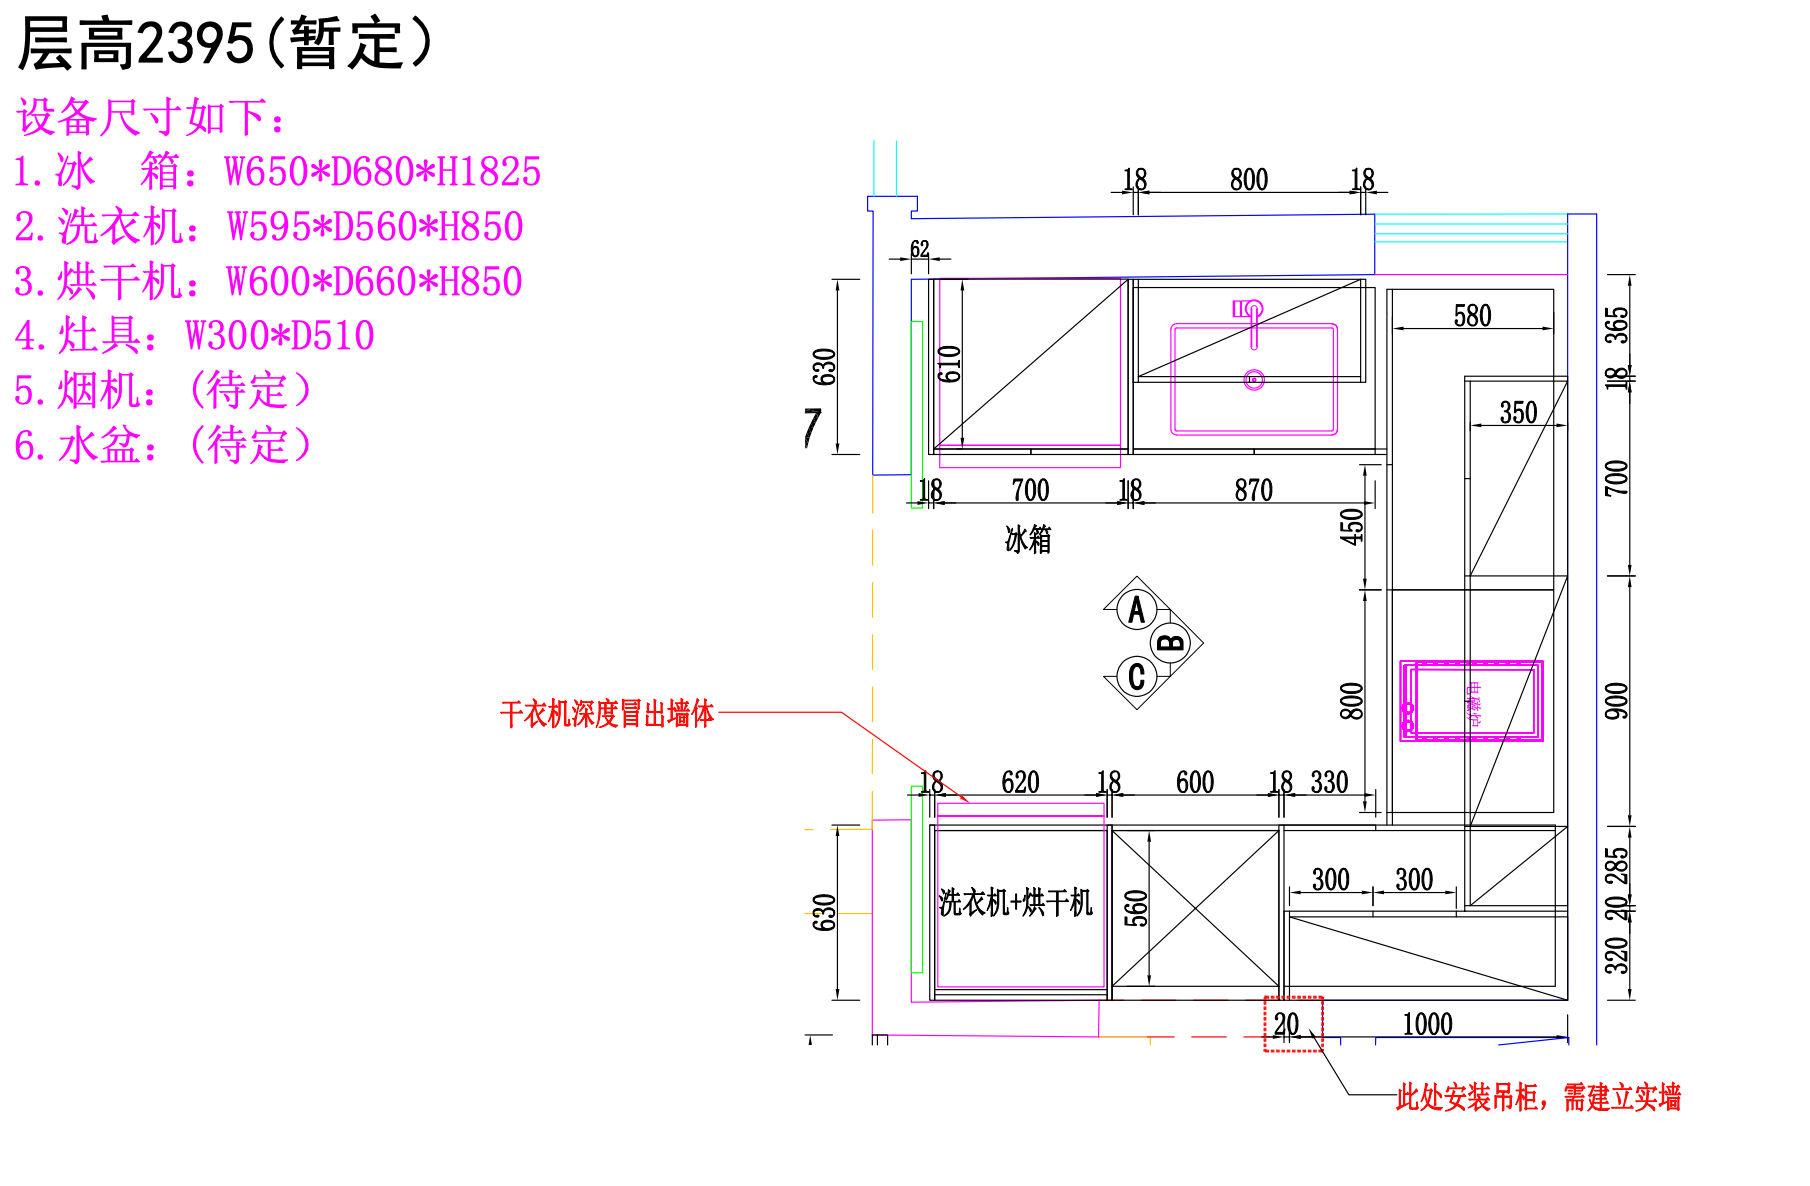
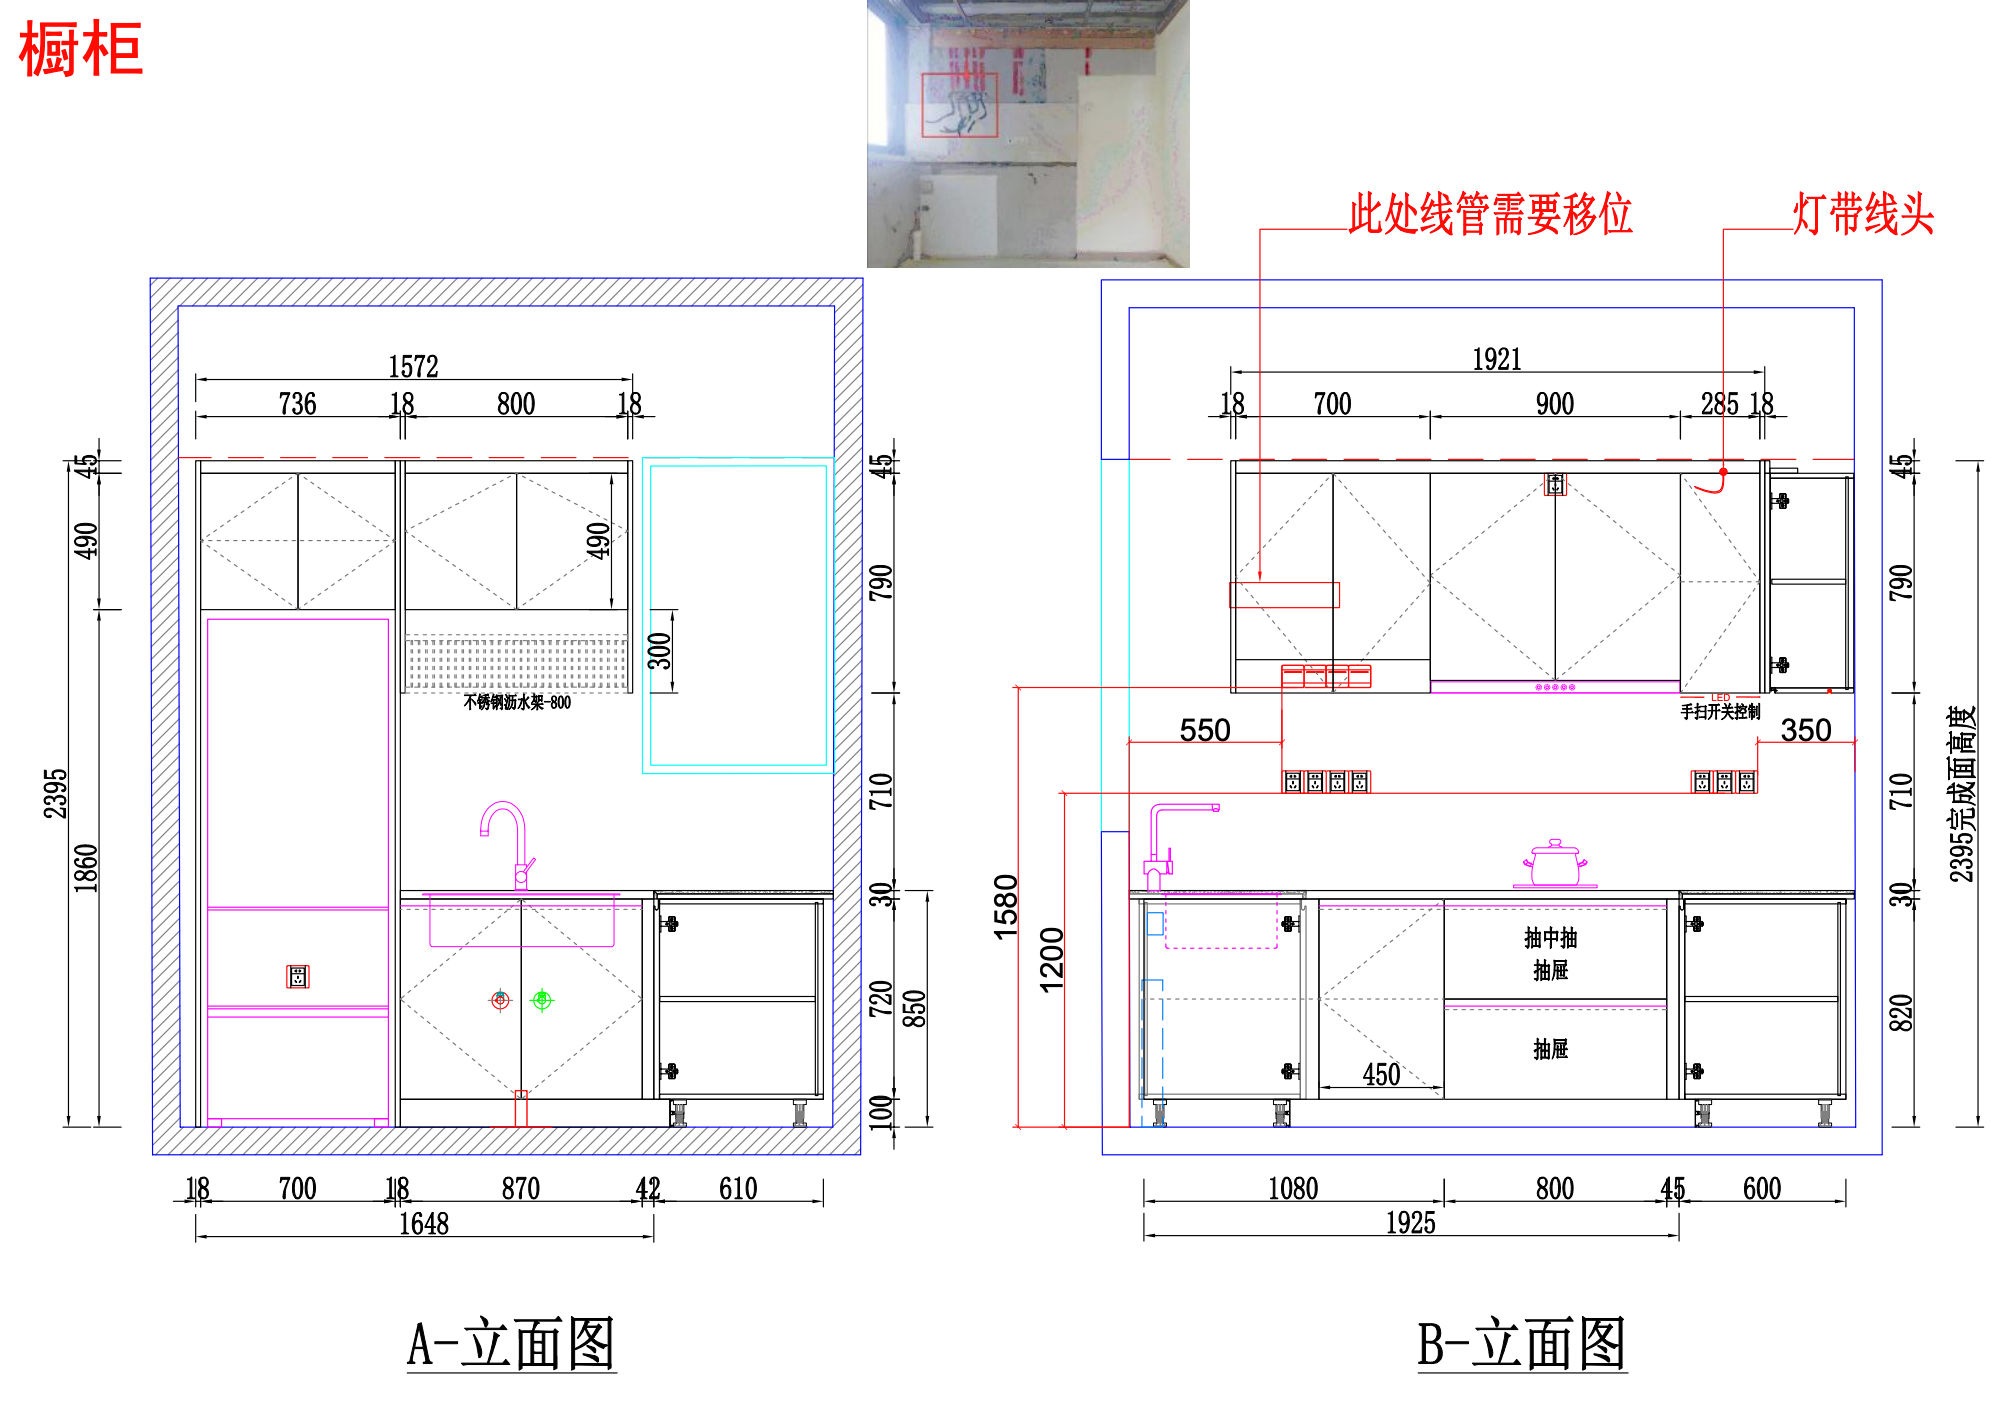
We started to drill down even further trying to see if things make sense here. The initial 3D is only good for visualizing the layout —so do not rely on it too much. It is just to get a sense of how things will look like; even so, you should not rely on it too much to make any decisions. It often distort and present a large space where the actual space is lesser. Measure everything you can. Buy mahjong paper and cut it out matching the size of the device and place it on the floor if you need to.
If you recall, we initially mentioned that we have all the big items like my Dyson vacuum, Tineco wet / dry vacuum, Rainbow vacuum, ladder, and dehumidifier. These are huge items that require proper storage and electrical planning, as these devices need charging. At this stage, we started to realize the designer does not actually plan storage for these stuff — or rather, you have to think about this on your own. In my case, our unit doesn't have the typical bomb shelter where you can stow everything. So very careful planning is required for all these big devices. After careful measurement and thinking through, we need to tweak the drawings again because we need to fit these devices somewhere.
Designer should design a space around what you do, how you live, and primarily it has to be functional, not just looking good. Everyone can achieve looking good now, screenshot a couple nice stuff, dump into ChatGPT and burn tokens. Eventually you will get something good. But design is personal, is catered to you. Your house. Your preferences. Your likings.
Adding a sliding door — and a crazy markup
We also wanted to add a sliding door to the kitchen entrance because we were thinking we may need a place to separate our dogs — especially as they are very excited when our doorbell rang. My younger dog tends to like to jump on anyone that comes through the door. We were quoted $2,400 from Carpenter A for this. Something I couldn't accept. So I took the measurement of the space, and went to enquire first with one of my friends in this trade — he said it's roughly $1,200 if you go direct. So we decided to go direct. Later we change our mind again by going even more direct. But the construction of the sliding door tracks still need to be done by the wet works team. So a bit of coordination required here.
Electrical points enquiry
In the group chat I asked about when we are discussing the electrical points, since we need to plan where to have them — is it a single socket, double socket, data point, light point, etc. My wife asked about it twice before me. So I'm raising it for the 3rd time. Radio silence. At this stage I'm losing confidence with this wet works team. Decided to contact Yongjin Electrical — the contractor that I remember clearly from my friend's renovation — and have them do my electrical instead. Surprisingly, when I messaged them, the response was “Are you free tomorrow? I'll go down to your unit.” Wow, this is really efficient. I made the call on Wednesday. I couldn't make it on Thursday so I scheduled Friday instead.
Going through the detailed drawing
After being ghosted for the 3rd time on electrical, I am stepping up my game to look through closely on everything as I felt they could not be trusted. I also realized this wet works team are not up to speed. All this while, I also realized we are liaising directly with the 2 designers based in China. Makes me wonder what value the folks in the SG team bring. Never mind.
Looking more closely at the detailed drawing, I find even the detailed drawings are poorly done. It doesn't account for allowance — extra space to operate the machine. If you ever have to move the fridge or washing machine from a tight space, you know that you need space to move. Unless you have good tools to move it, you need a bit of allowance. The spaces are so tight it seems quite impossible to be able to plug in the electrical point. I started to feel a little impatient here.
Meeting with Yongjin Electrical
Met up with Yongjin on Friday at my unit to go through what is needed. Quote came on Saturday. Straightforward, fast and efficient. Paid deposit, go ahead with the works.
Electrical works scheduled
Electrical works are scheduled one week later. And pretty much done on the same day. Typically, they do concealed wiring for exposed areas, while they do trunking for places inside the carpentry. I realized this adds a lot of complexity to the carpentry works later on.
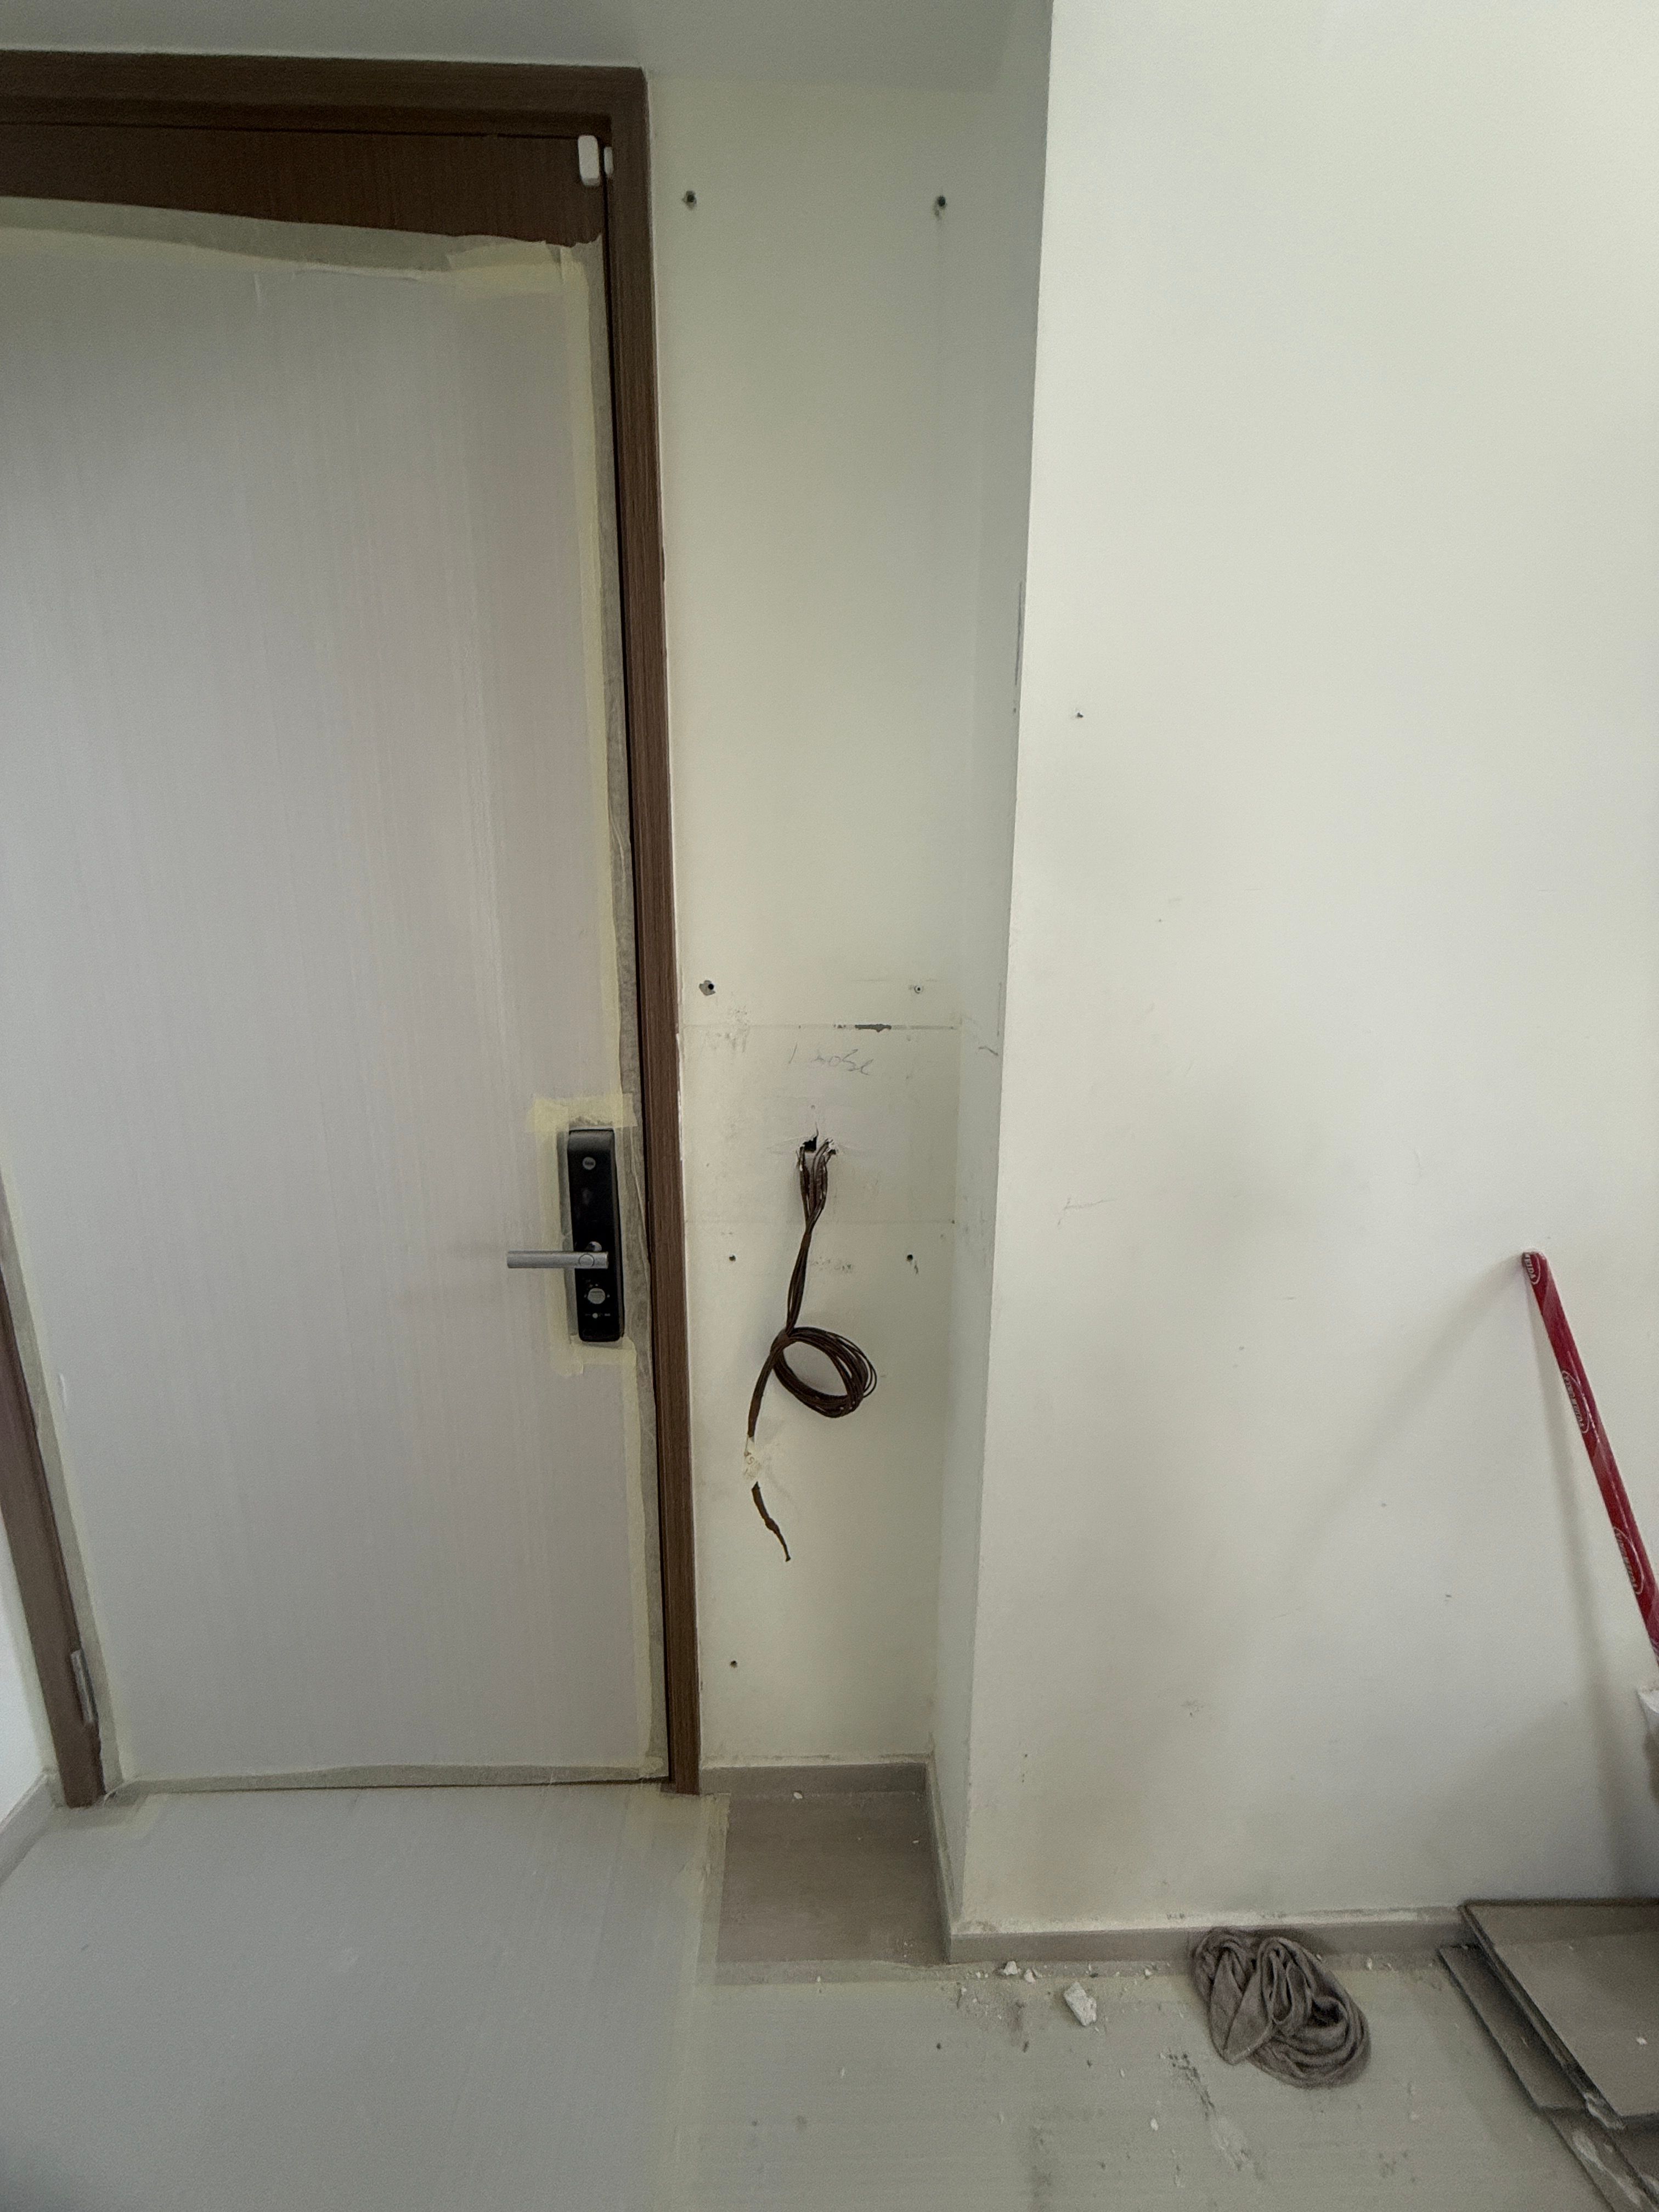
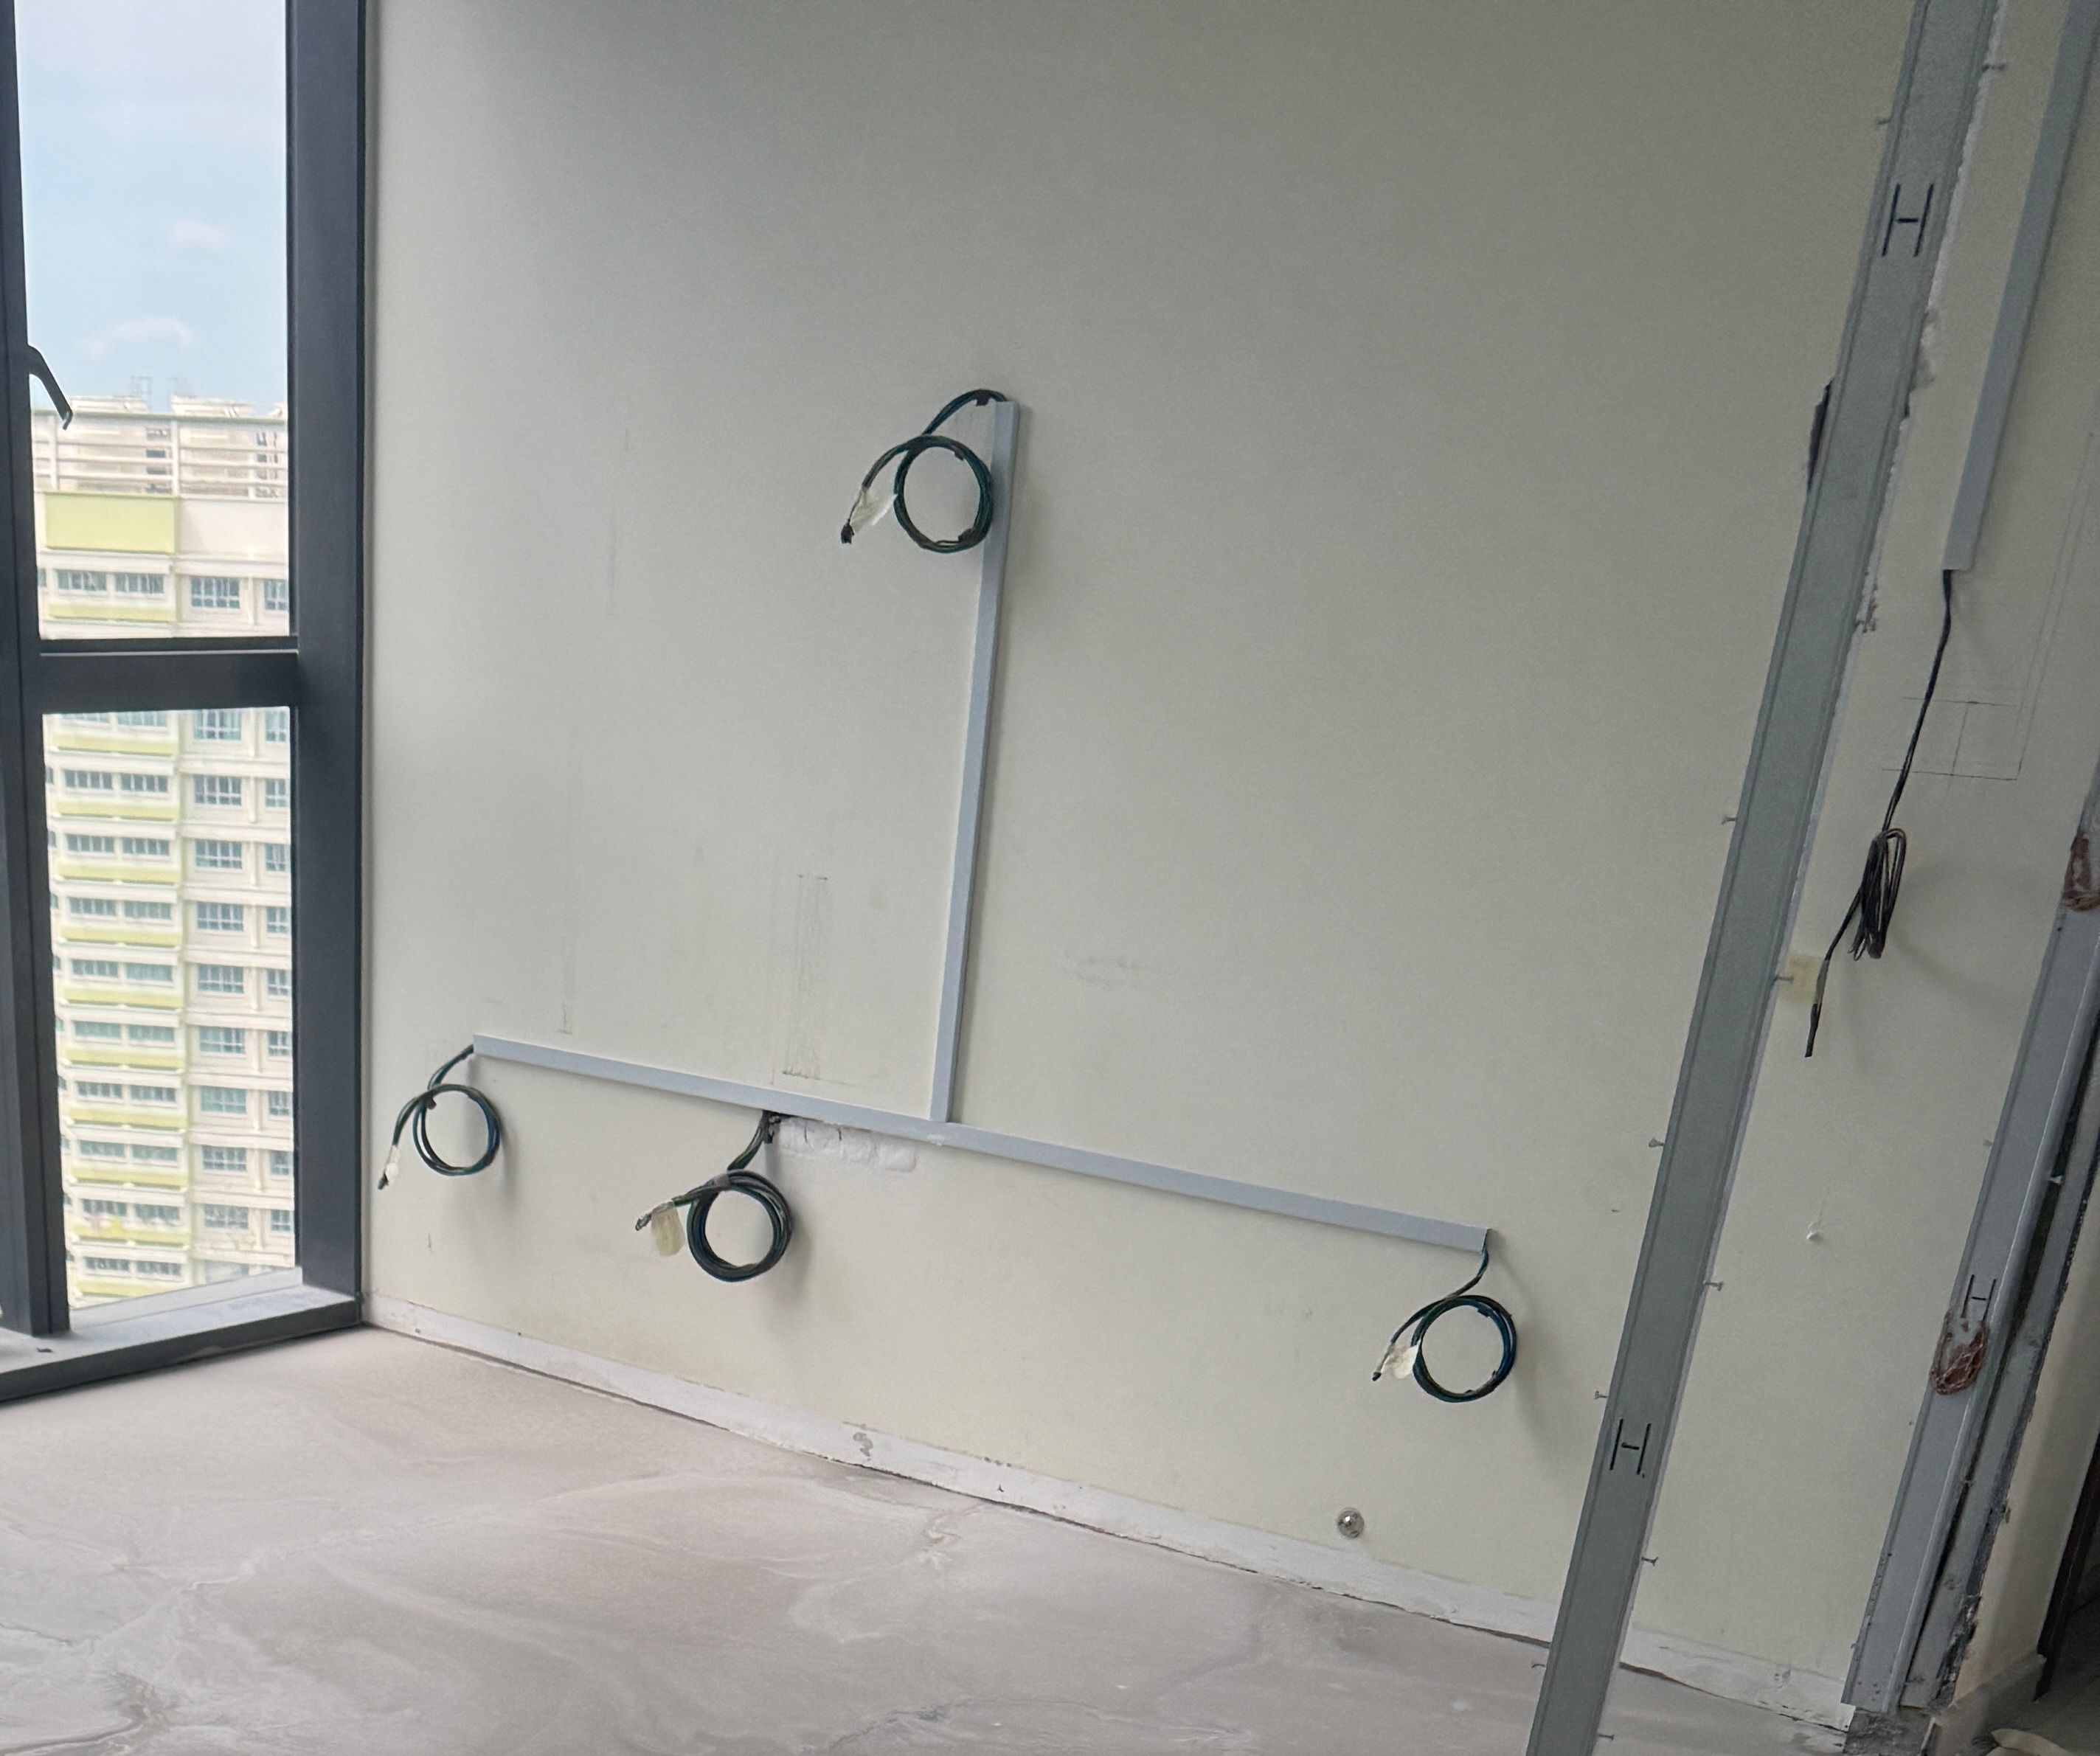
This is because the carpenter side need to leave space for the exposed trunking. You can imageine the complexity and the measurement involved. After realizing it, I told Yongjin to conceal it. This involves hacking the wall and hide it inside the wall.
Tiling for kitchen
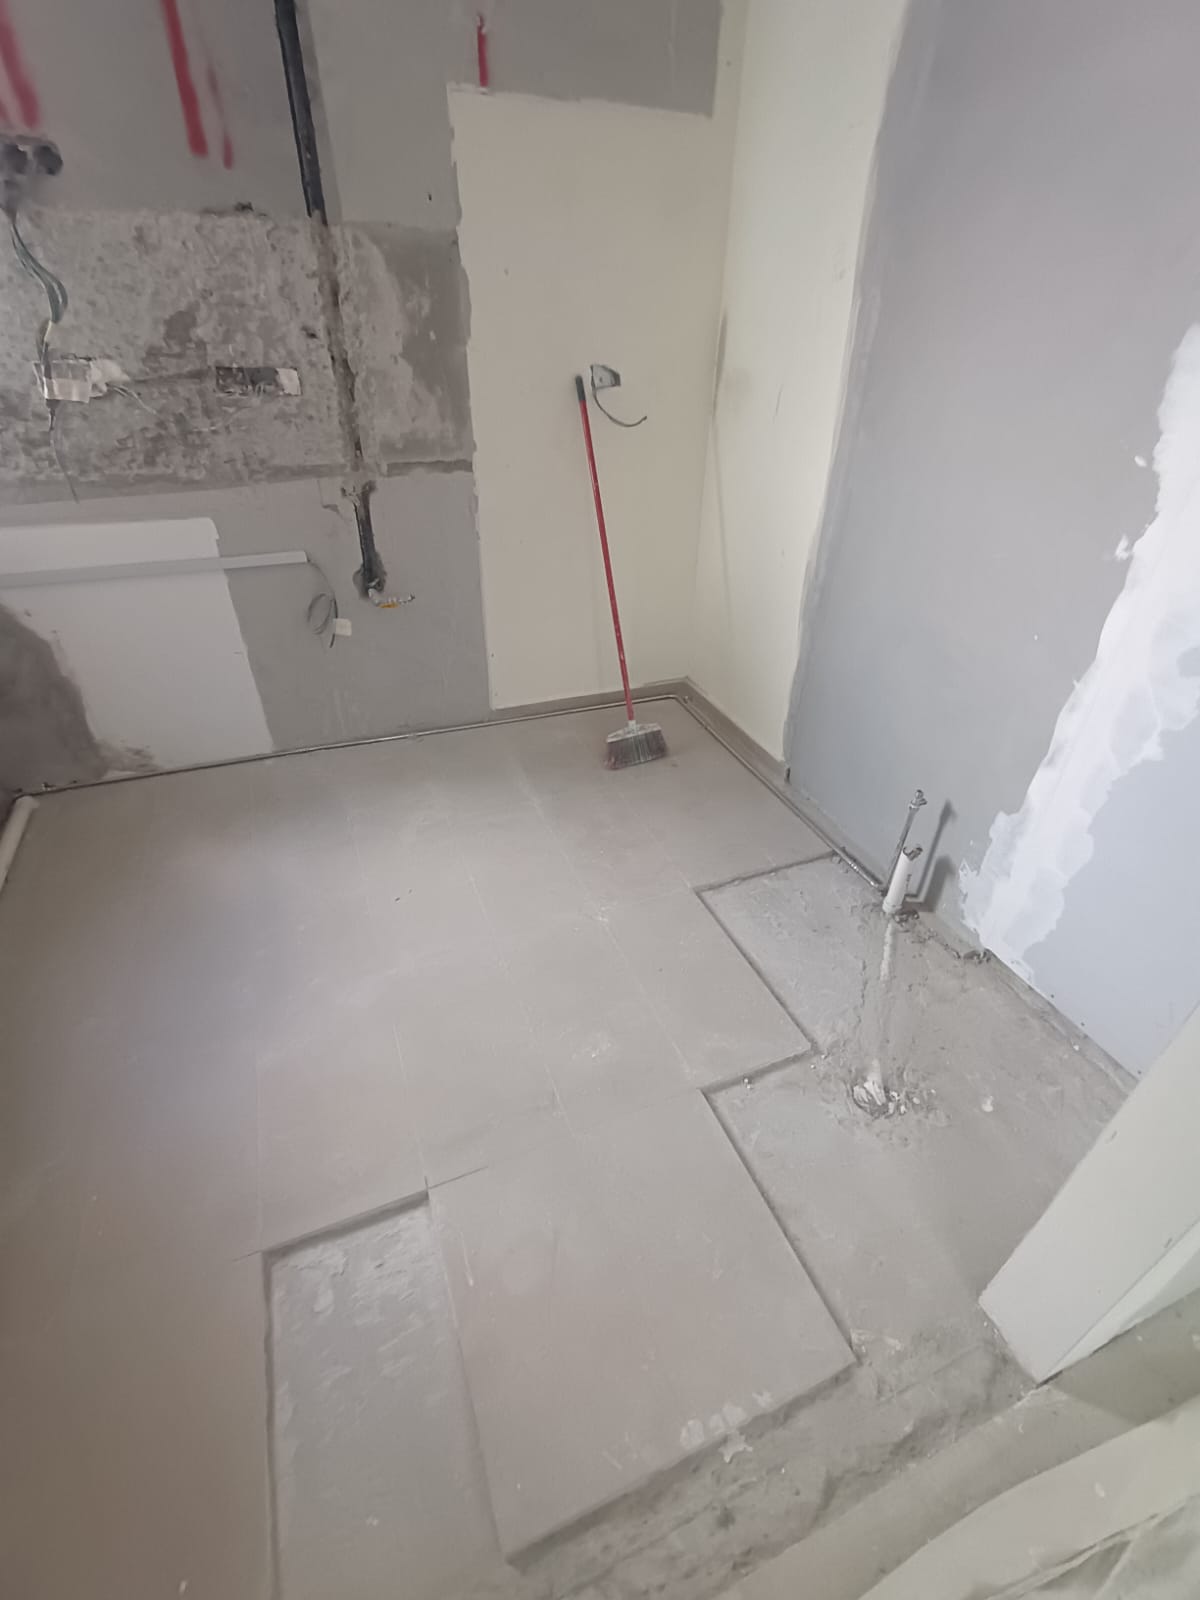
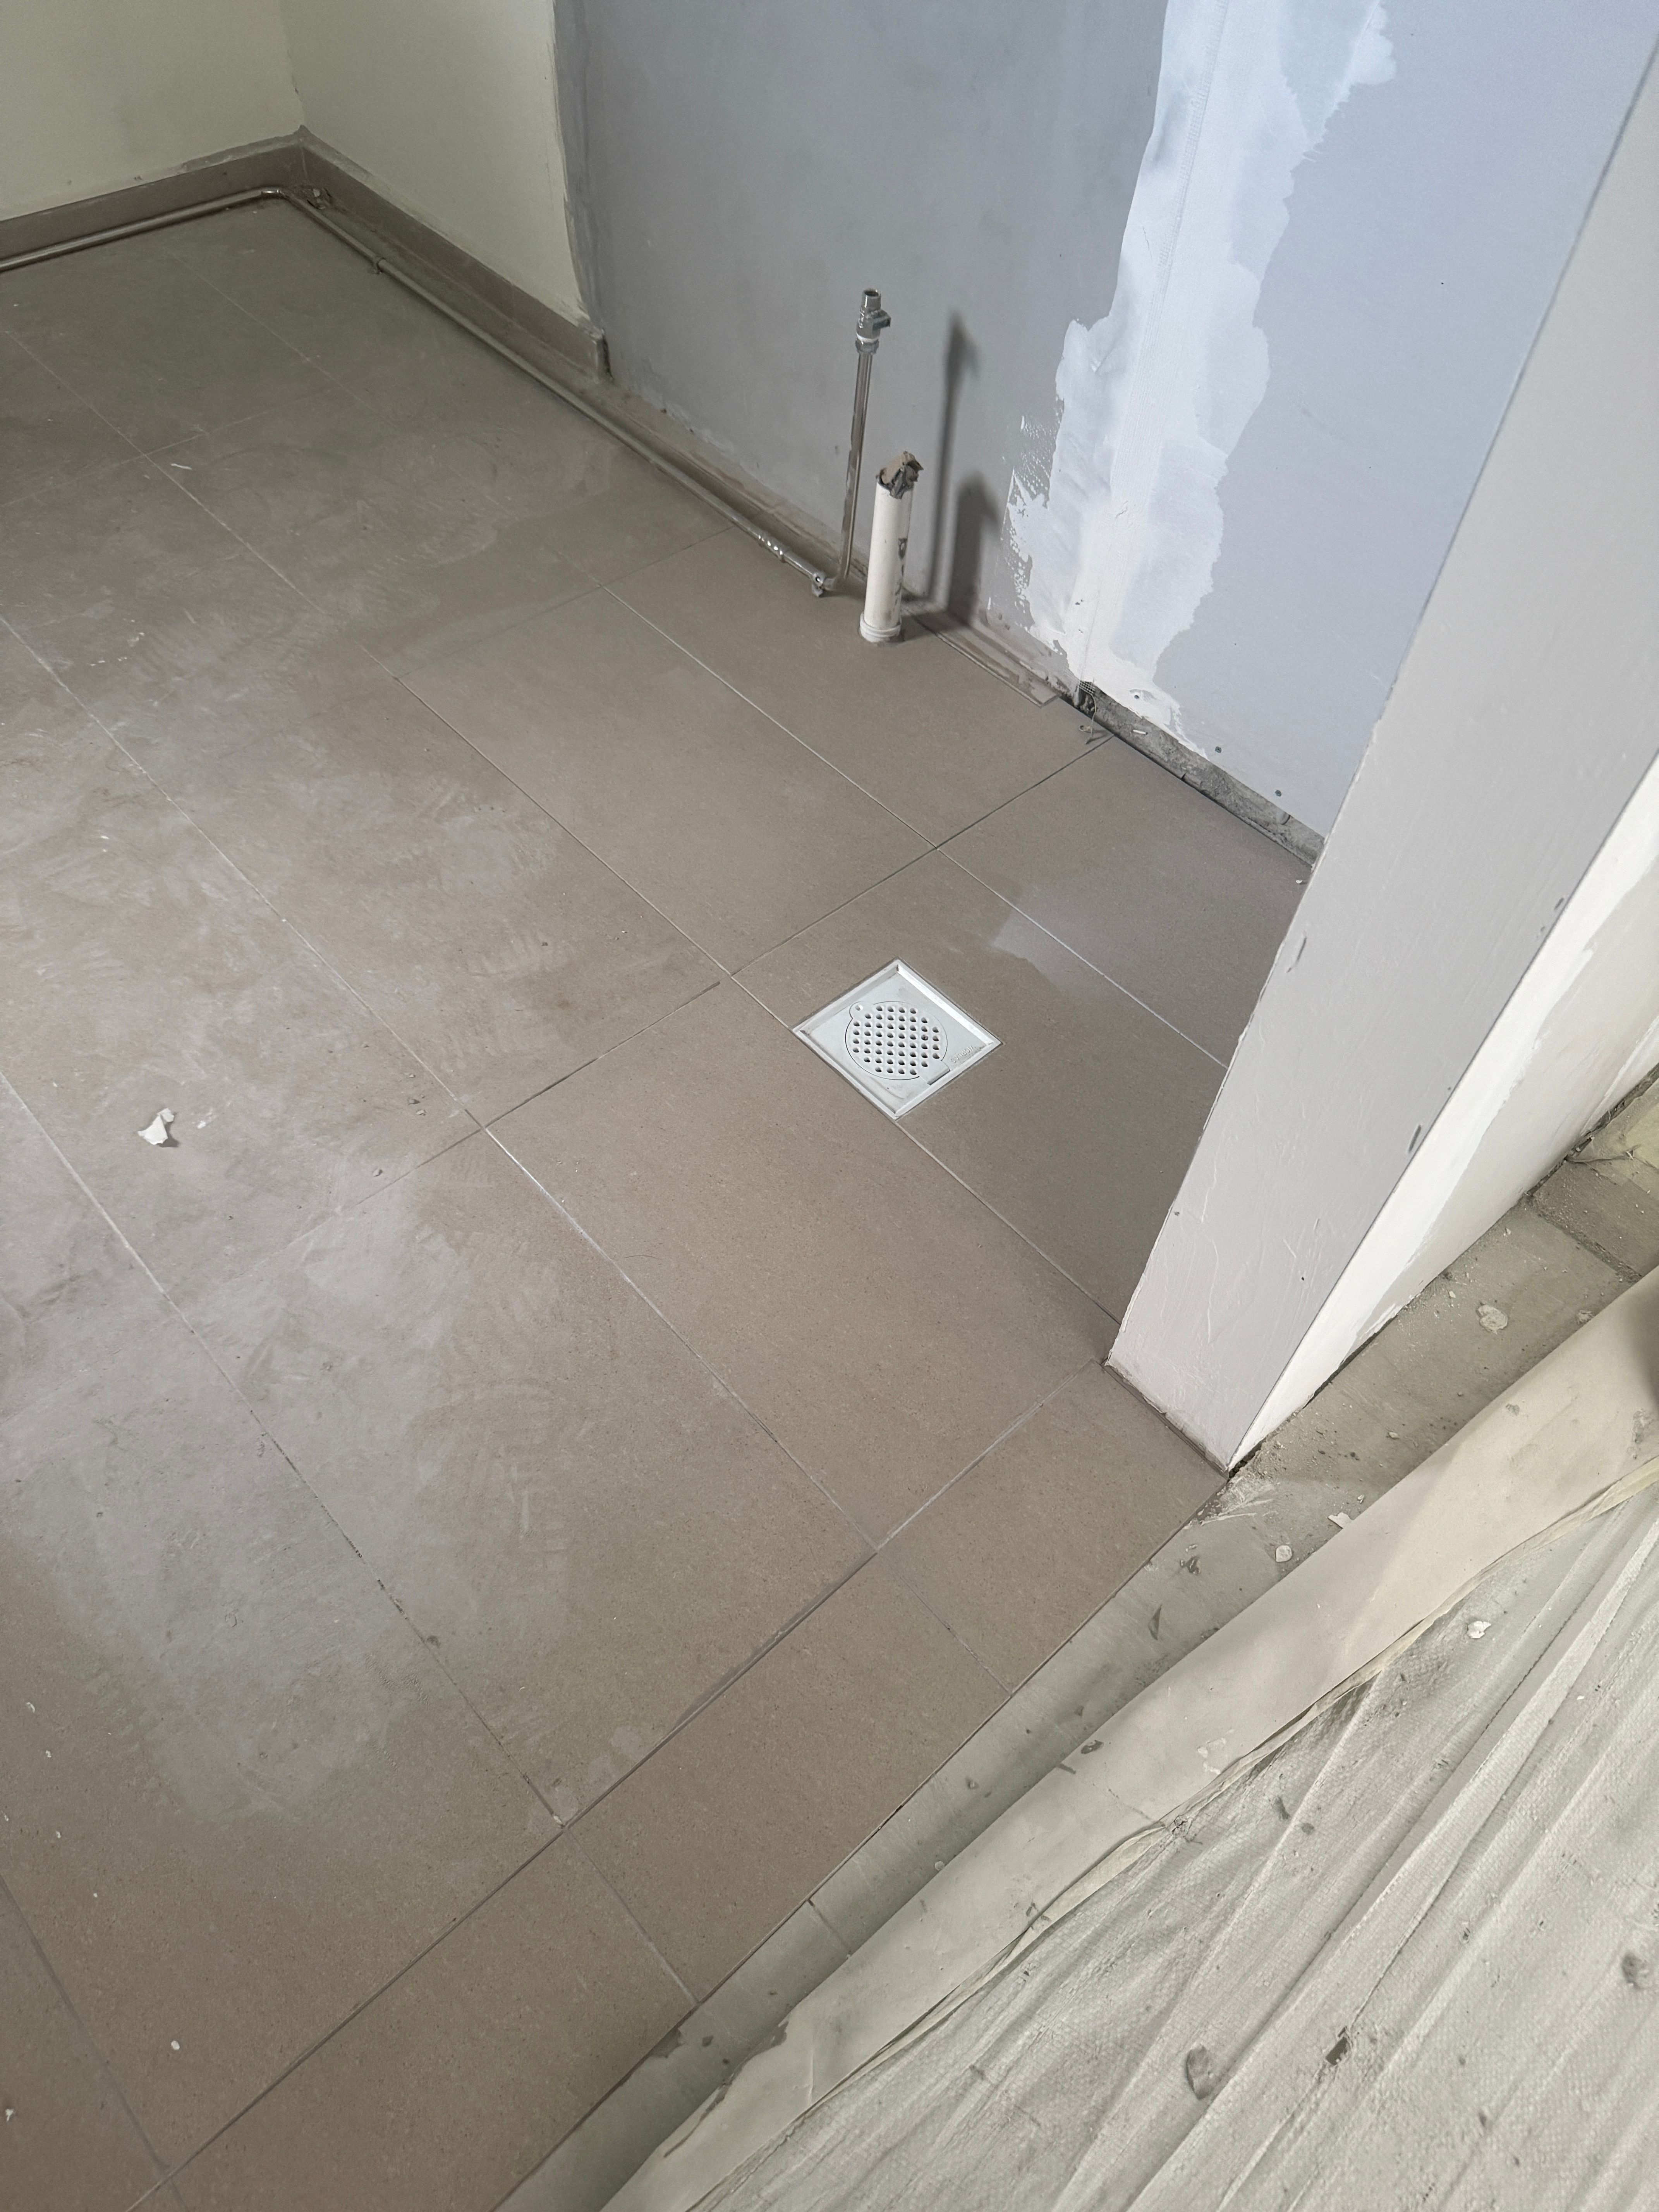
Because of the changes in layout for my kitchen entrance, the wet works team need to lay the pipes for plumbing for my washing machine, hack some of the kitchen tiles, and lay some pipes for water output as well. Our tiles are from Hup Kiong. We personally drove there to get some replacement tiles — about 6–8 pieces. Then the wet works team arranged to replace the tiles in the kitchen.
Revised quote from Carpenter A
After a lot of back and forth to sort things out with the designer based in China, it came to a point the detailed drawings are pretty much sorted — but we wanted an updated 3D for our TV feature wall, and that hasn't been updated to us despite asking for it 3 times. At the same time, we received the revised quote. So our initial quote consisted of a huge L-shape settee that cost $7k. After some considerations and planning, we decided to remove that. $30k less $7k will amount to $23k.
However, the revised quote became more and increased to $32k. I am puzzled at this point. Because the measurements are all taken with a high-end Leica machine, so measurement shouldn't be off, right? So in my mind, what could be the reason for the change from $23k to $32k? I totally lost my trust at this point with Carpenter A.
After some clarifications, they claimed the changes were due to various adjustments here and there. But when I brought up the fact that the job of a Leica scanning machine is to nail down the exact measurement, no one seemed able to explain the variance.
This kind of experience makes it really difficult to continue — if a supposedly precise measurement tool can't guarantee a reliable quote, what exactly are you paying for? At this point, my confidence in Carpenter A had dropped significantly. I began to feel this was becoming a textbook case of renovation markups and shifting goalposts.
Looking for alternatives
Since I have the detailed drawings, I went straight to Taobao and searched for 新加坡全屋定制 (Singapore whole-house customization) and enquired.
You can see there's tons of these vendors on Taobao. Some even have a showroom locally—which almost always means higher prices. But after my experience dealing with Carpenter A (where I mainly communicated with designers based in China), I really don't see the value in engaging a carpenter with local showroom.
Think about it: if you go through a local presence, you're just indirectly paying for the rent, the showroom, the salesperson, and all the additional overhead. At the end of the day, you're often still dealing with an employee—just paying more for the same product or service.
I landed on one vendor based in Guangzhou. I asked for a quote based on what I was doing — sent in the 3D together with the detailed drawing. I was quoted around $10k for the same things I wanted to do with Carpenter A (exclude shipping + installation). Am I skeptical? Of course I am. The quote came in 1 day later. Not too bad. I also asked if I want to see the works done, where can I view them? They advised that they have an ongoing installation at Hougang. I was asked to set up a group chat on WeChat and liaise from there.
Then a group chat was set up and I arranged a timing to go down to the Hougang place to have a look.
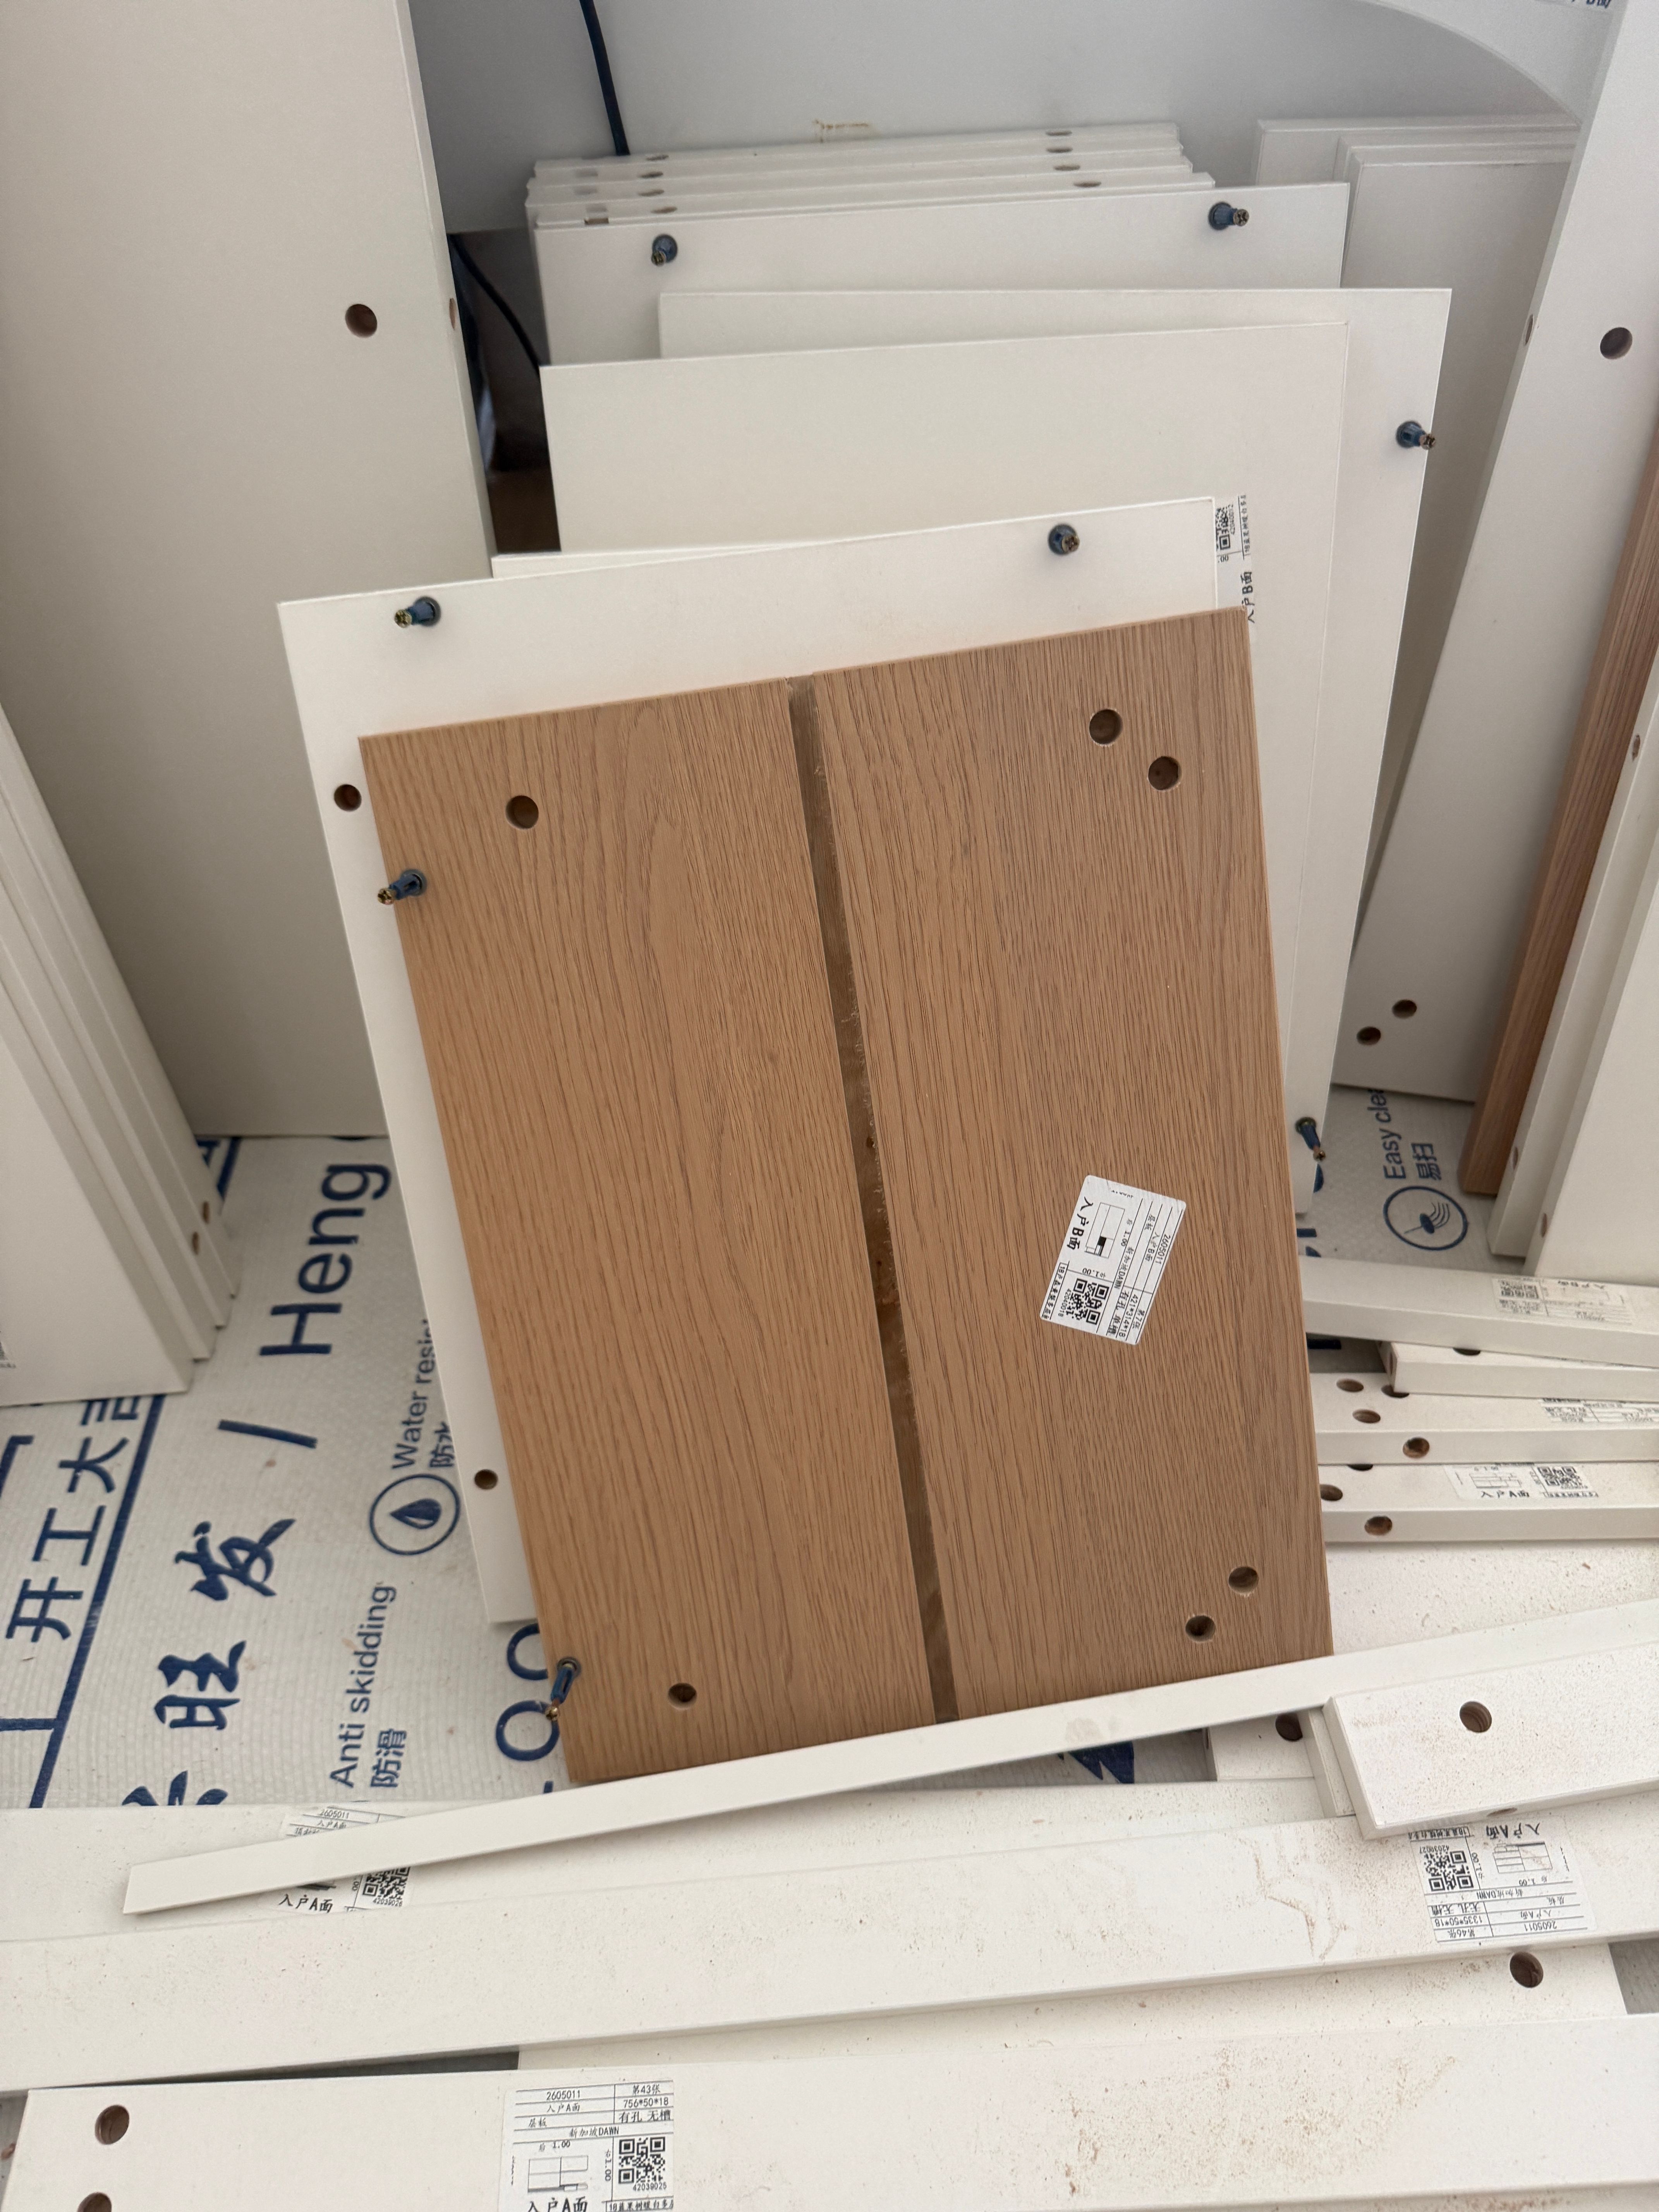
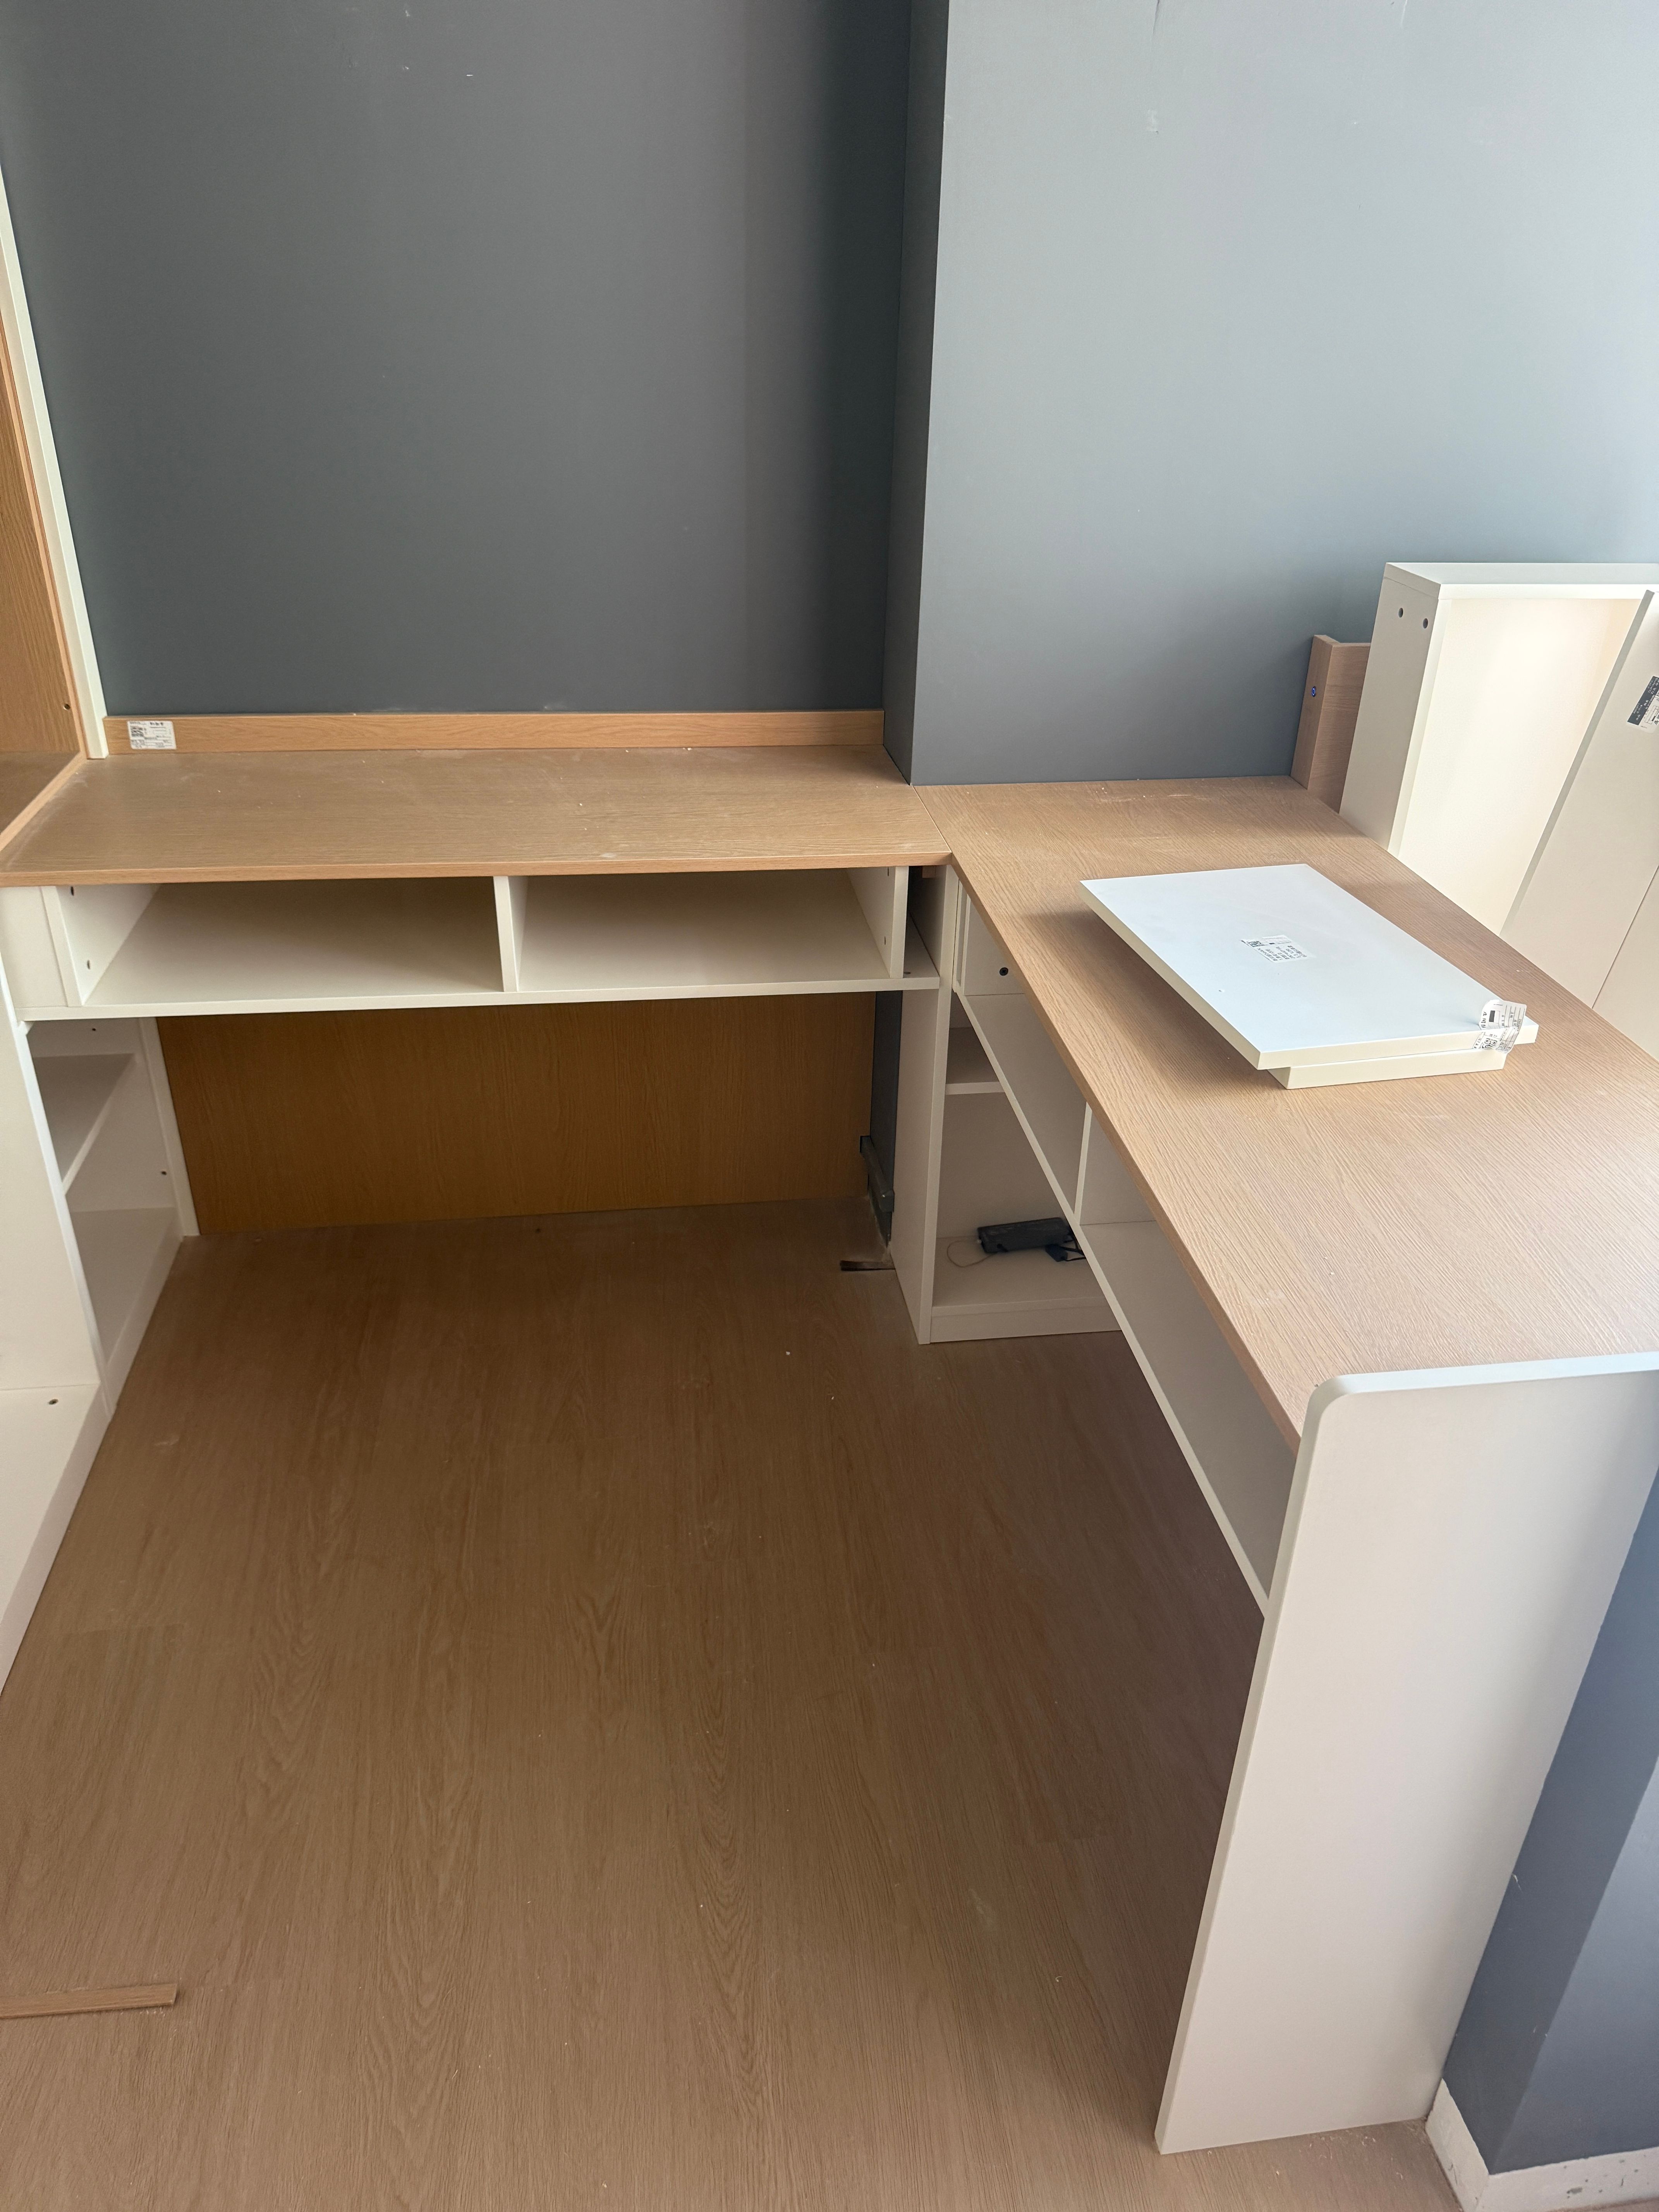
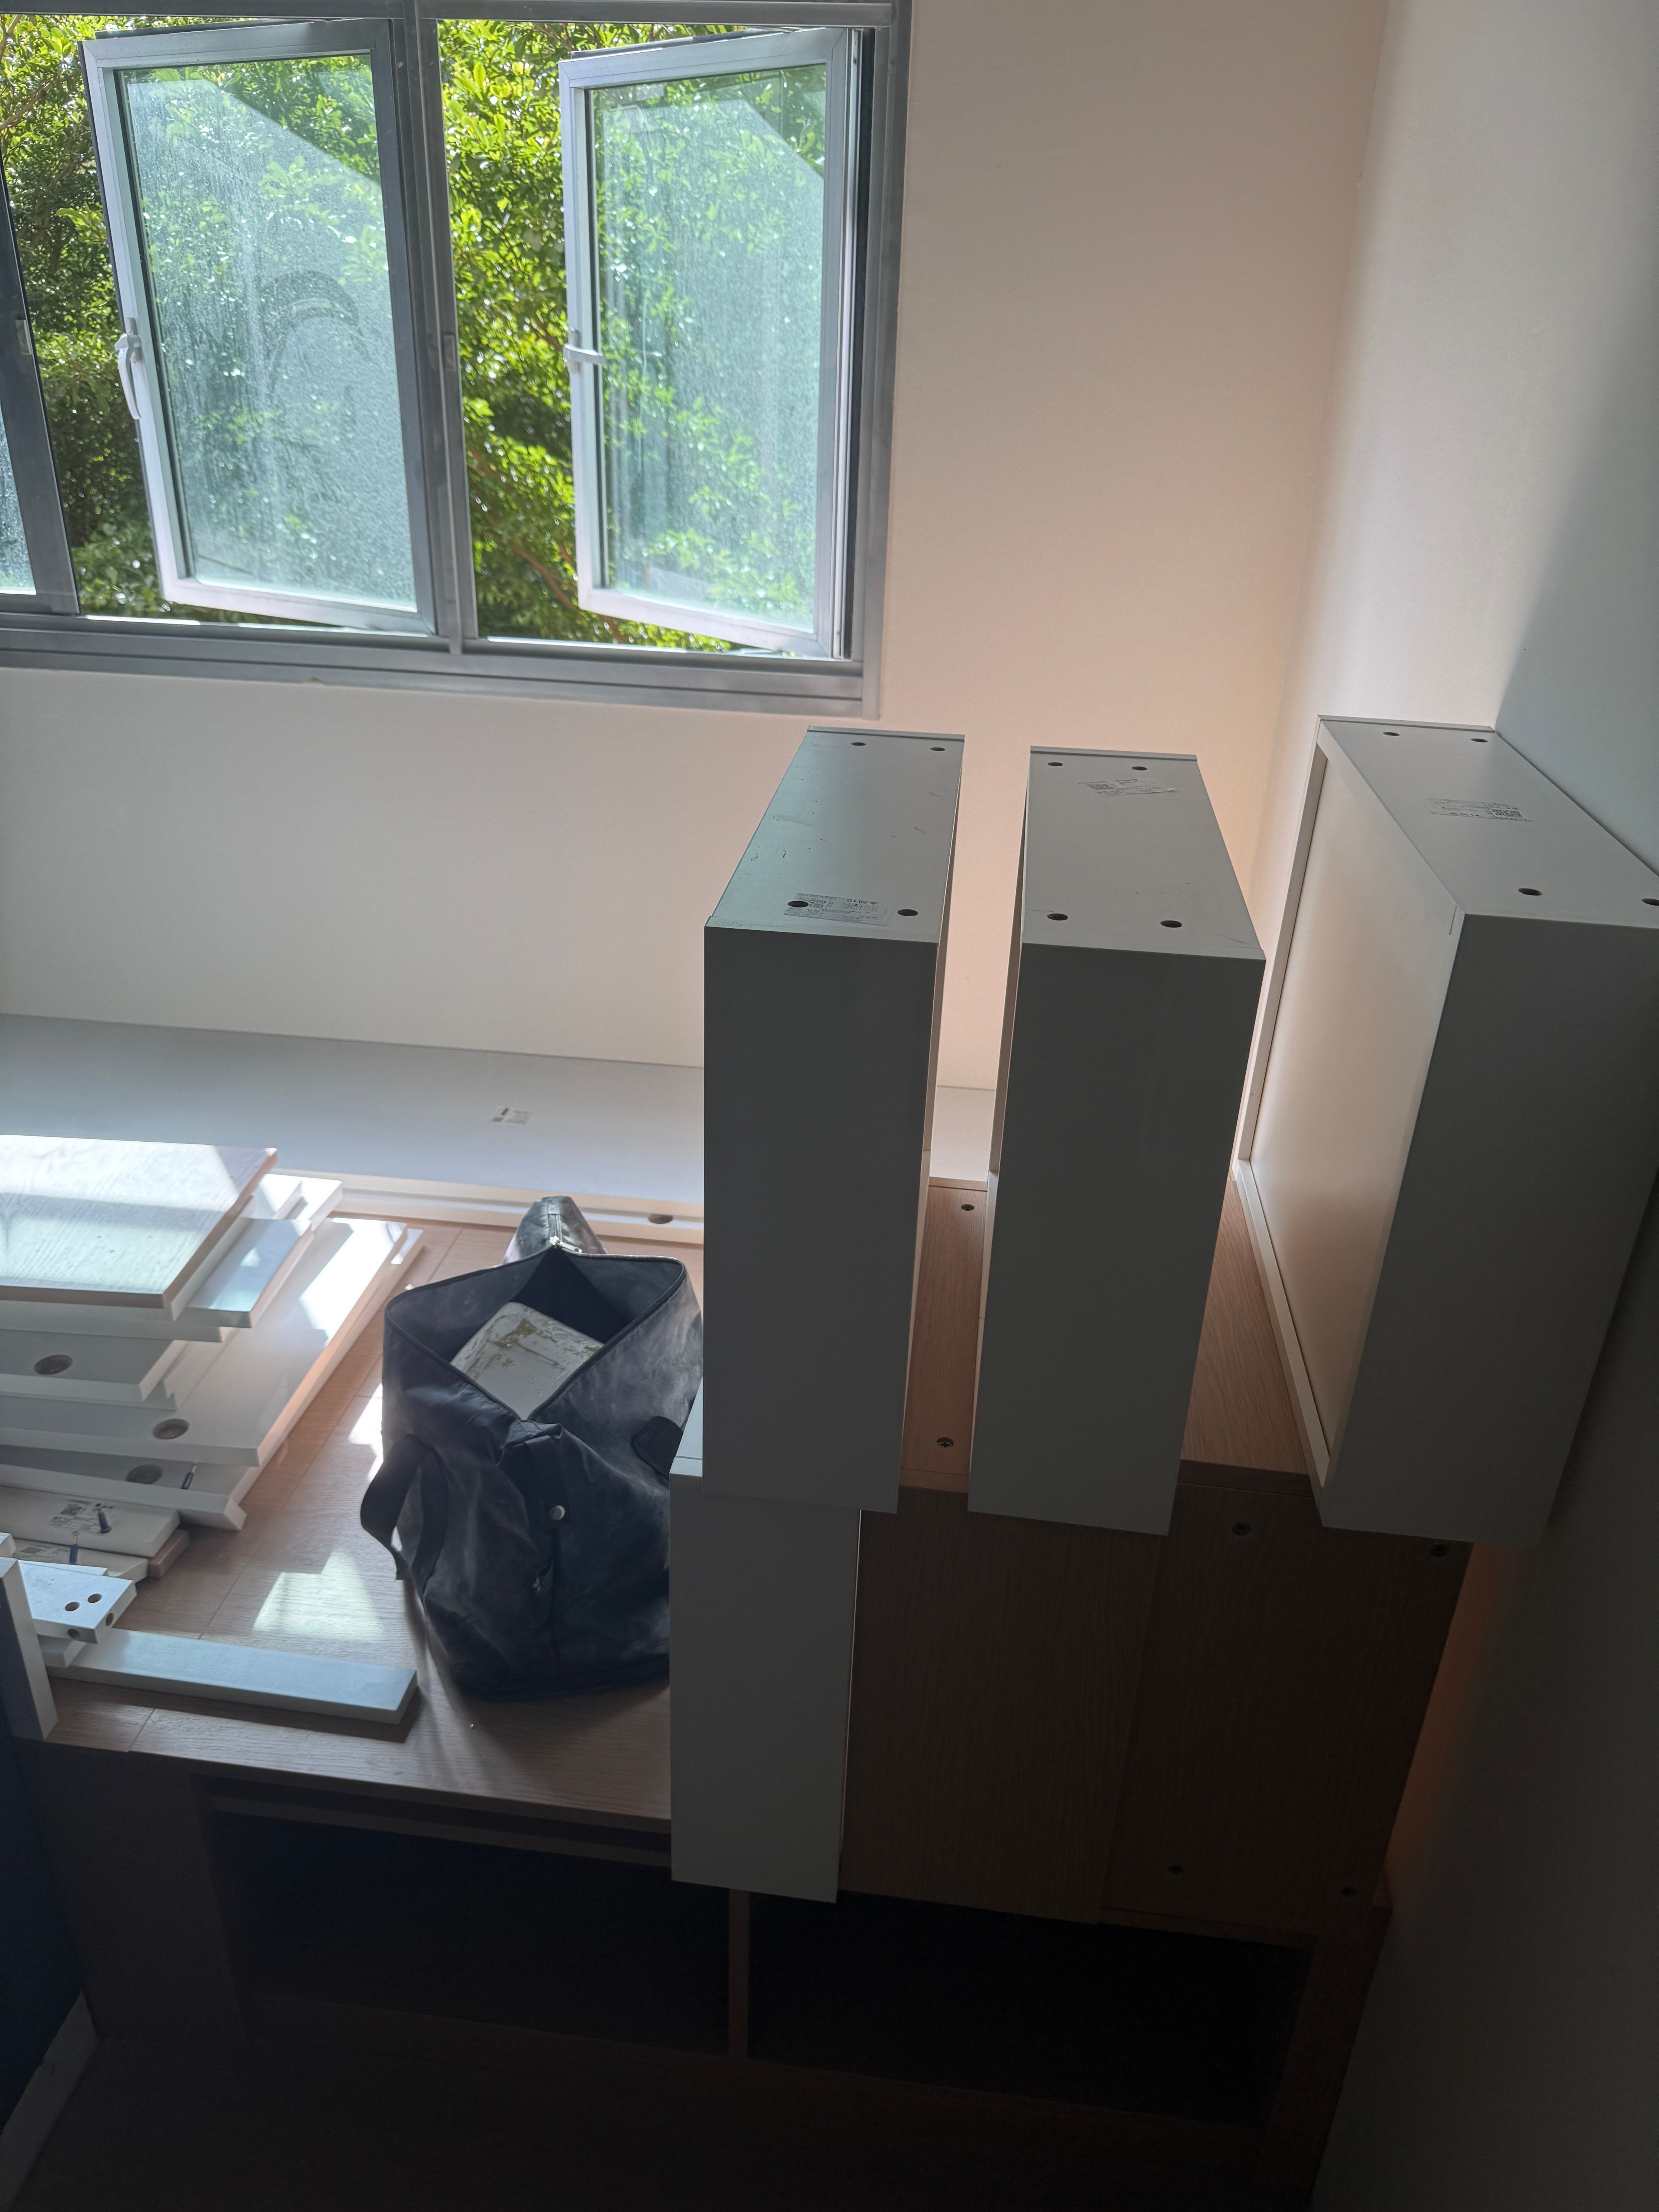
The finished carpentry at Hougang looked very much like IKEA—simple, modular, and clean. The overall effect felt no different from the local offerings, but at a much lower price. One thing to note is that the switch for the lights inside the carpentry units is provided along with the build, as can be seen in the video below. Some photos taken on site.
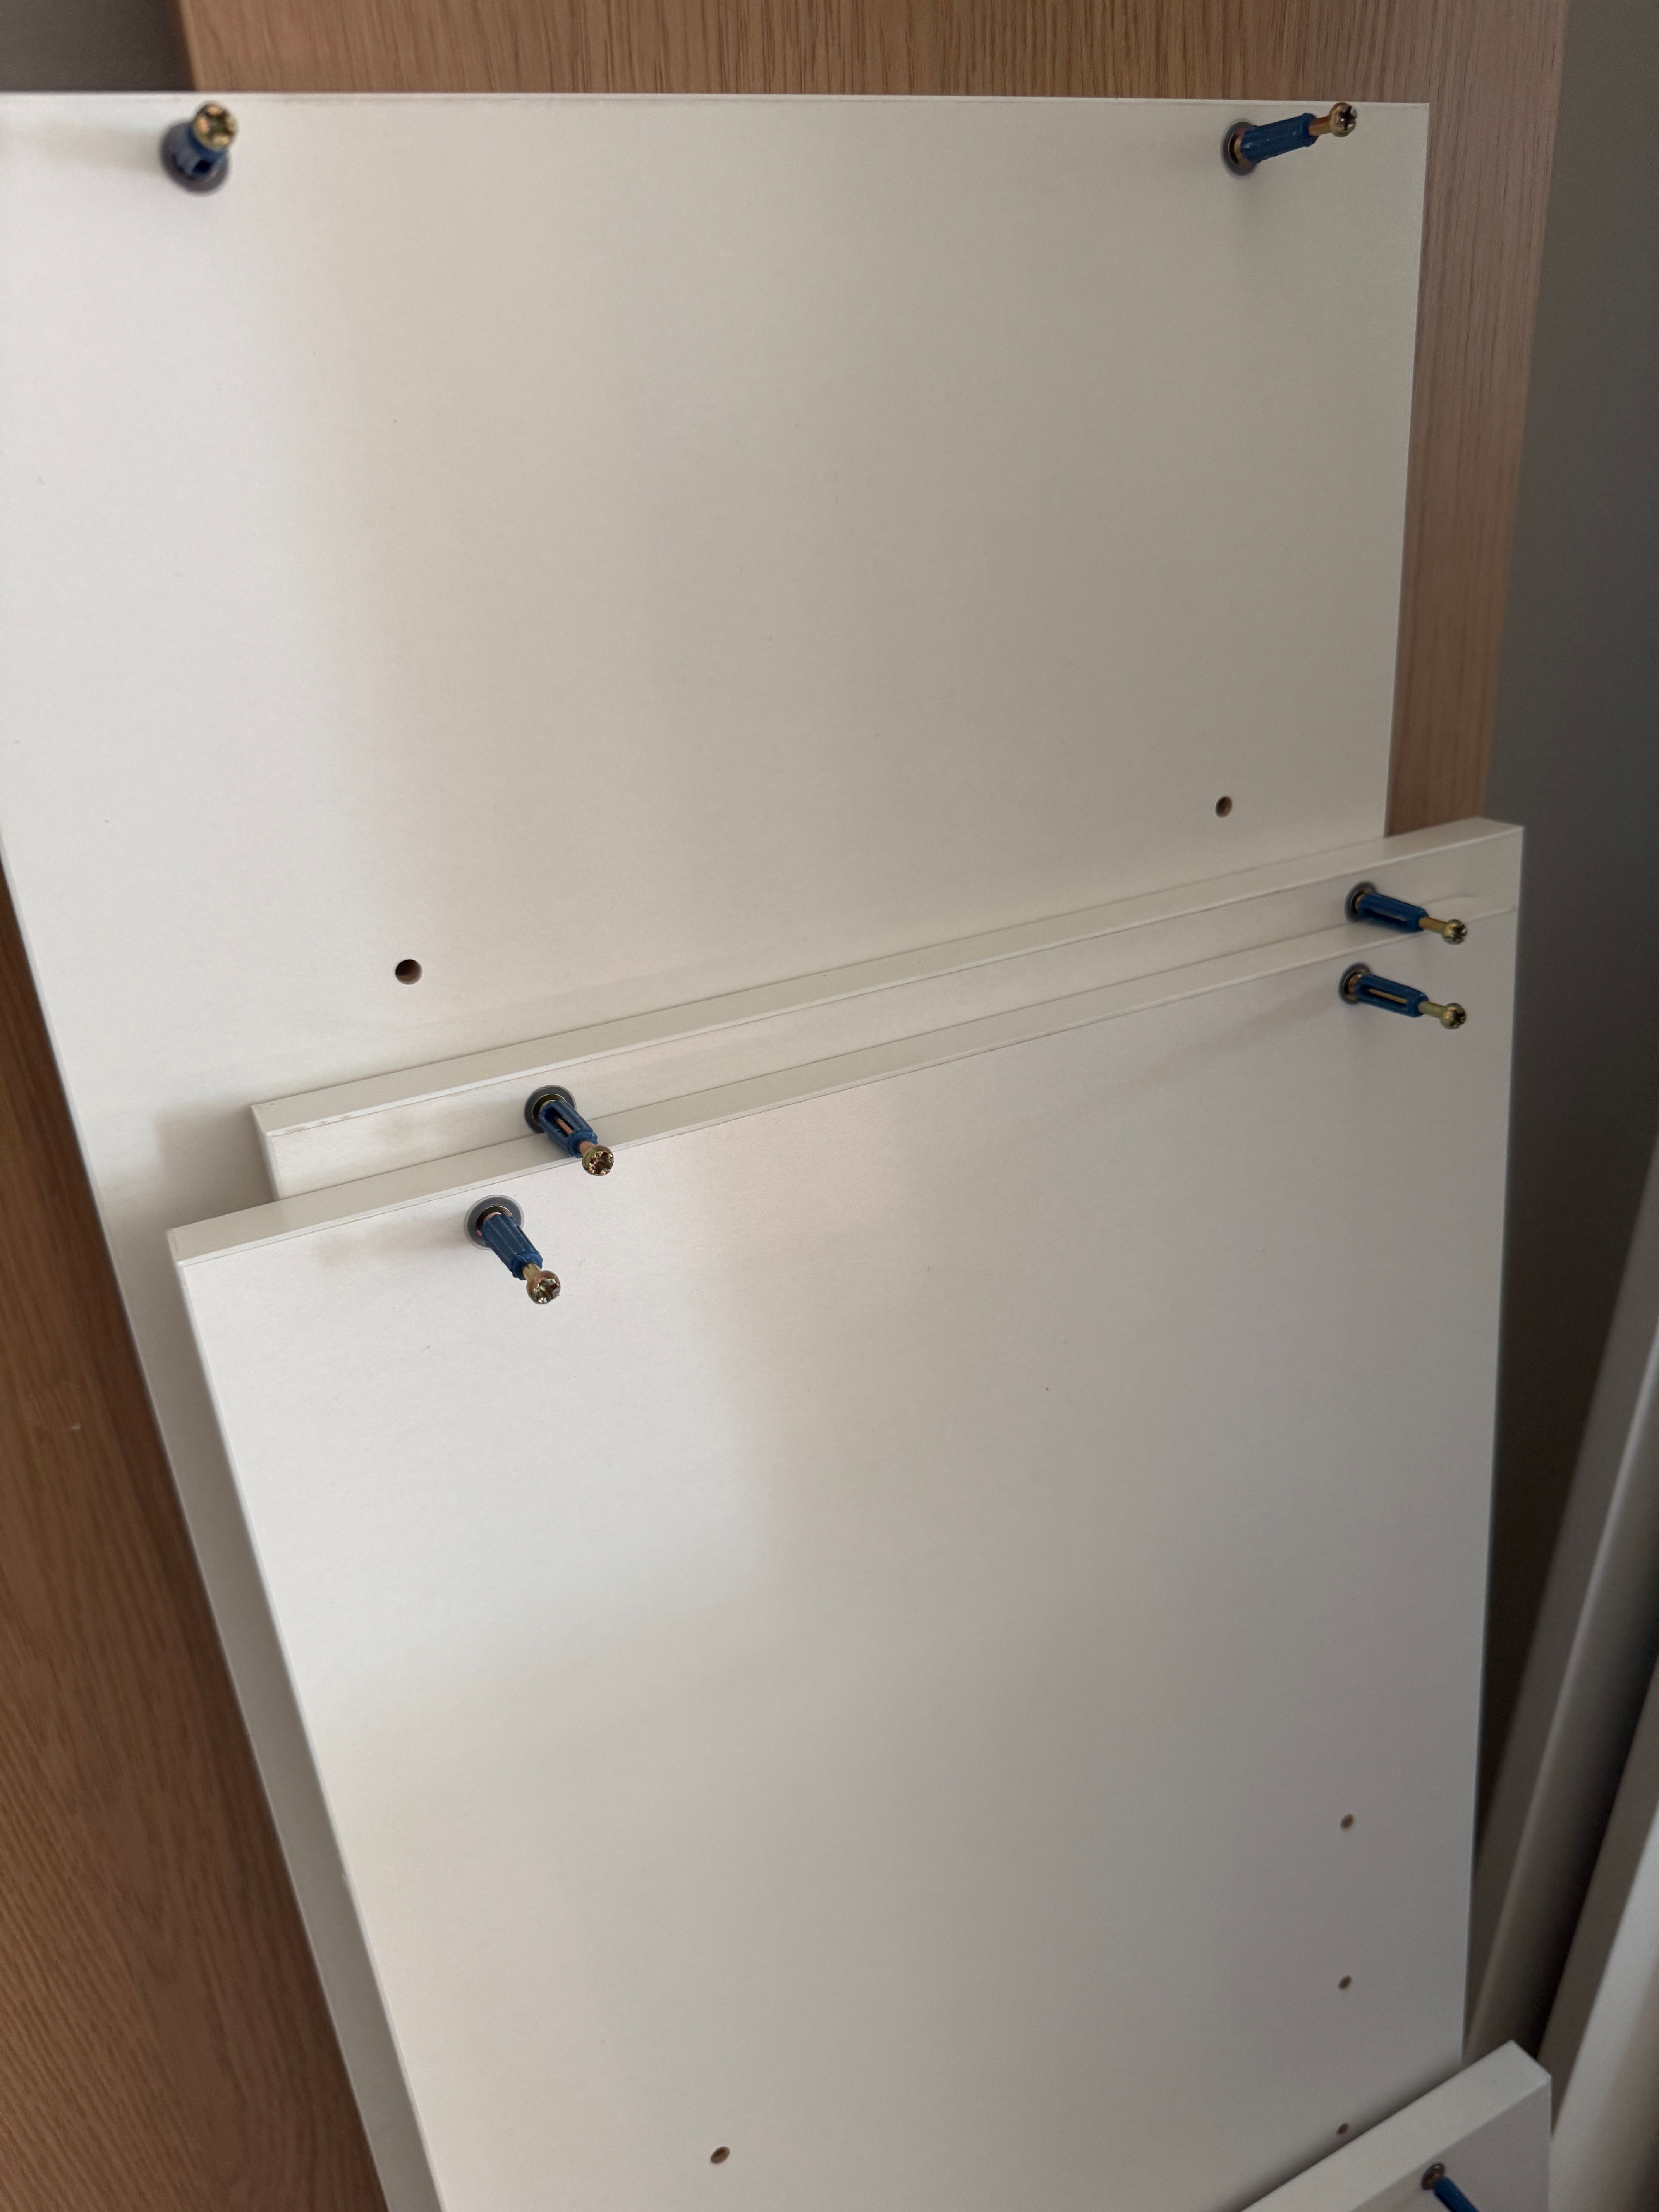
If you can't play the video, click here to download/view directly.
At this point, I've decided to part ways with Carpenter A and haven't told them yet. Wanting to be more cautious and learn from experience (do not trust 1 quote only — ask for multiple quotes), I asked another vendor I found on Taobao which led me to Jishang Furniture. I spoke to the customer service — they are based in Foshan. I followed the same process, sending in my 3D together with the detailed drawing. This time, I received the quote on the same day. I am quoted $7k+. I was totally shocked. A little skeptical. So I asked again where I can view the works — she gave me an address near Hillview. So I asked further, turns out it's the boss's address. She stays in Singapore. So I arranged for a viewing to go to her residential place for viewing. She is using her own place as a showroom. On the same day I went Hougang, I went to her place for viewing after.
Why I ended up with Jishang Furniture
I had a few exchanges with the boss directly through WhatsApp, but later on moved to WeChat as the main communication method as most folks prefer using WeChat.
She is extremely transparent. She actually called me directly on my phone and did a bit of introduction about what she does. I also asked very direct questions, like why the price varies so much. She explained that she doesn't have a showroom, no salesperson, no ads. Everything is directly from the factory. I was skeptical of course — given the huge variance in pricing.
She even uses her own residential as a showroom. In my mind, I was wondering — this makes perfect sense. And to allow your customers to go up to your house, I don't think you have anything to hide. It gives me the confidence to go with her rather than the Guangzhou factory reason being I can look for her if anything goes south and I know where she stay.
To kickstart, I just need to pay a deposit of CNY 2,000 or S$400. So I went with it, paying S$400 to her via PayNow — and that's how I ended up with Jishang Furniture.
Quotation Clarification
I clarified the quote with the boss — the 7k+quote was actually given by her customer support on Taobao. I wanted to find out what that 7k+ actually consists of. She quickly clarified that it's using some basic material, and that it is charged at RMB 799.
The level of customization is very, very extensive, with a lot of materials to choose from. My quote ended up pretty high — around SGD15K instead. However, that entails much better quality, which I'm charged RMB 1,199 per metre for because we are using very good quality wood. Not saying that the RMB 799 isn't bad. It's just that they allow very huge variants of customization.
It's worth mentioning that the S$15K quote also includes the sliding door for the kitchen. Originally, we were planning to get this sliding door from a direct supplier in Singapore, which would have cost around S$1,200. However, having it included as part of the overall package with Jishang Furniture only cost S$600 — so there was additional savings on this component as well.
WeChat group chat with the designer
On the same day after we paid the deposit of S$400, we were connected in a WeChat group chat with the designer — and things started moving on the very same day. We were told to list down any concerns we had. We sent over all the pictures with markup on what we need to do and what we are unhappy about. Basically I just screenshot everything and use Excalidraw to draw arrows and put our remarks inside the pictures.
It's extremely detailed because of my TV feature wall. We wanted to store dumbbells, so we told them this has to go in, and we also told them that our wires need to be hidden. He actually planned out the place to keep the sockets. Quite interesting because they have a lot of ways to customize the drawers.
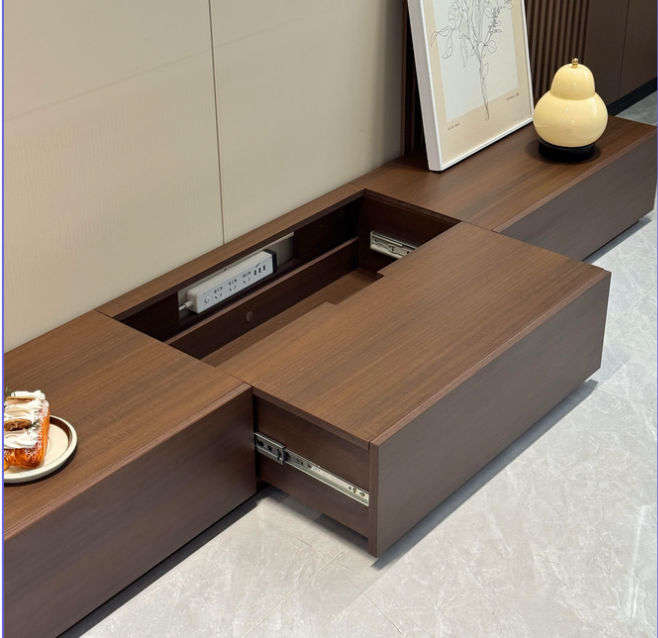
Apparently, this is extremely common in China. Go on rednote and swipe, you can see tons of examples.
Then we moved on to our other areas of the house, like the kitchen. For the kitchen sink below, I highly recommend building an electrical point under the sink in case you decide later to add on a water dispenser — easier to put the outlet in now than after the cabinets are closed.
In my first house — my HDB— I actually have this under-sink water heater / water dispenser. It dispenses hot water directly just at my tabletop, so I like this. Extremely convenient. Since I'm making changes, I wanted to add this as well, so we told them that.
Day 2 of Engaging Jishang Furniture
The designer sent us the edits that we requested on day one — on the next day at 2:00 p.m. Honestly, this was way faster than Carpenter A, which I liaised with previously. The speed and the efficiency of the communication were really, really crazy.
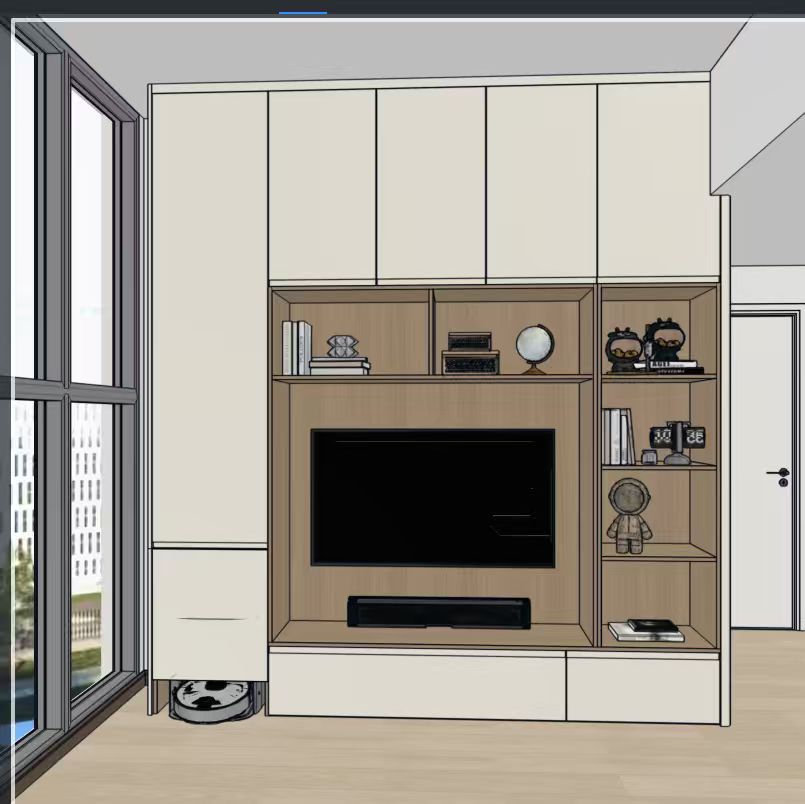
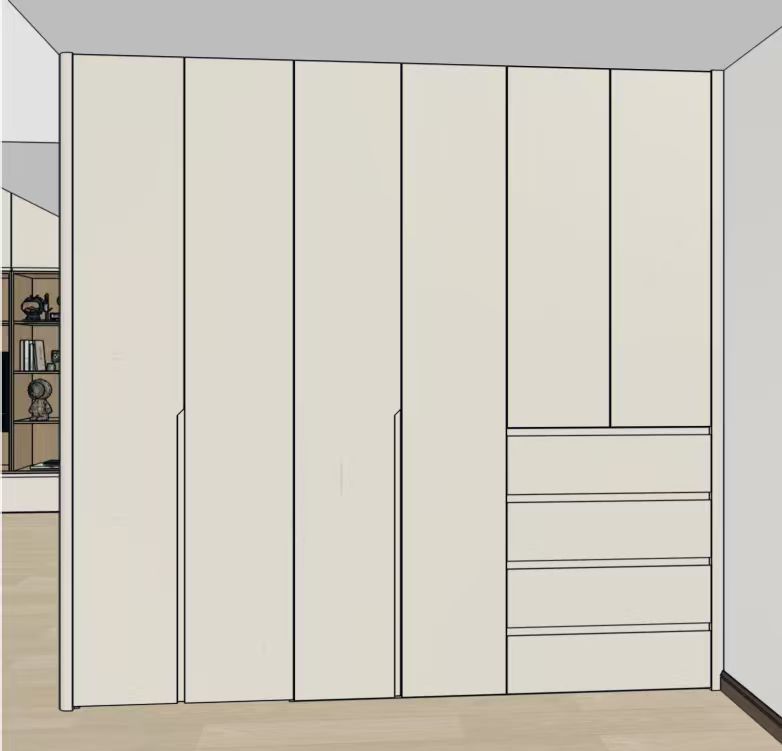
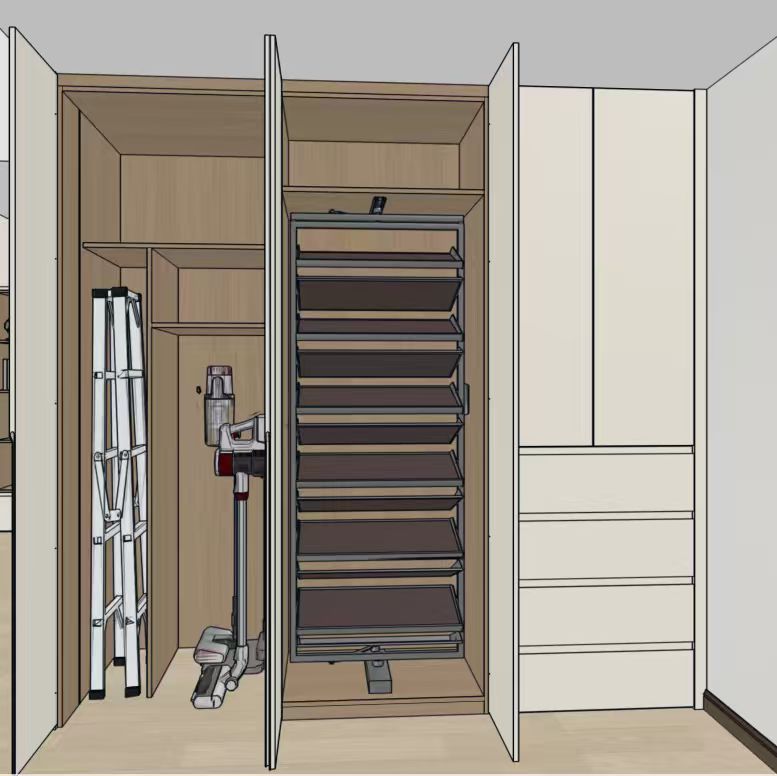
What I like about this designer is that the response is fast, and very often what he sent over is not just words, but with a picture to describe. When we are unclear, he will actually draw out and explain it to us — which I didn't experience with Carpenter A. Carpenter A's designer often just uses text to illustrate what they want to say. And slow. Or send us photos that try to describe but hard to relate because it is not my house. Whereas the designer here sends us photos of what fits into my house, build from ground up, rendering what is going to be in my home, that are very clear and easy to relate to. Makes the whole experience easier and more efficient.
I just felt it's a very different treatment here because, as a designer, you should design and just show us how it is going to look. What do you have in mind that can help us build our house? This is really very different. Show instead of tell.
Different Customizations That You Can Choose
Beyond the overall layout, there are quite a few customizations you get to decide on. Colour and material are the obvious ones — what finish you want on the boards, what the surface feels like. Then there's whether your carpentry has a handle, and the different ways the door can open — swing, lift-up, push-to-open, and so on.
Hinges are another choice. The default they use is DTC, but if you want Blum, you have to top up. Blum is very popular for most people.
You can also do curvere edges for your carpentry.

The base is another one, especially in the kitchen. You'll decide how the cabinet sits off the floor, and in some places you can actually skip the base altogether if that fits the design better.
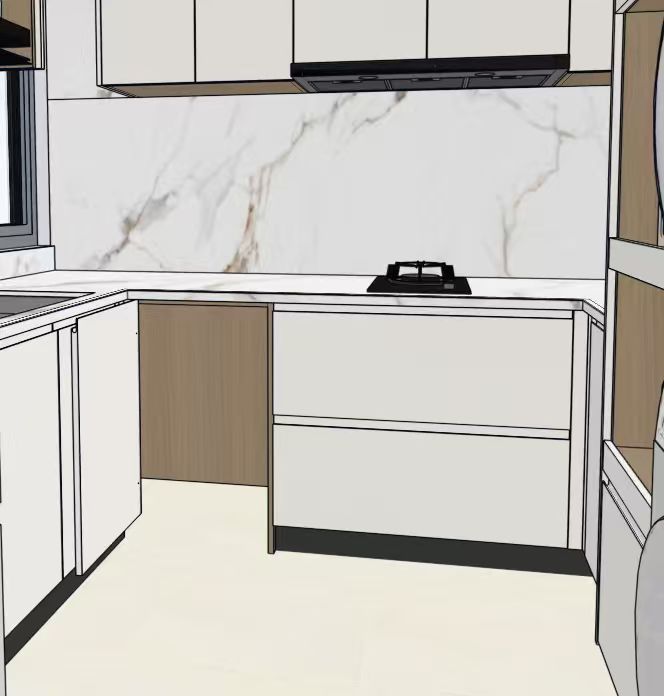
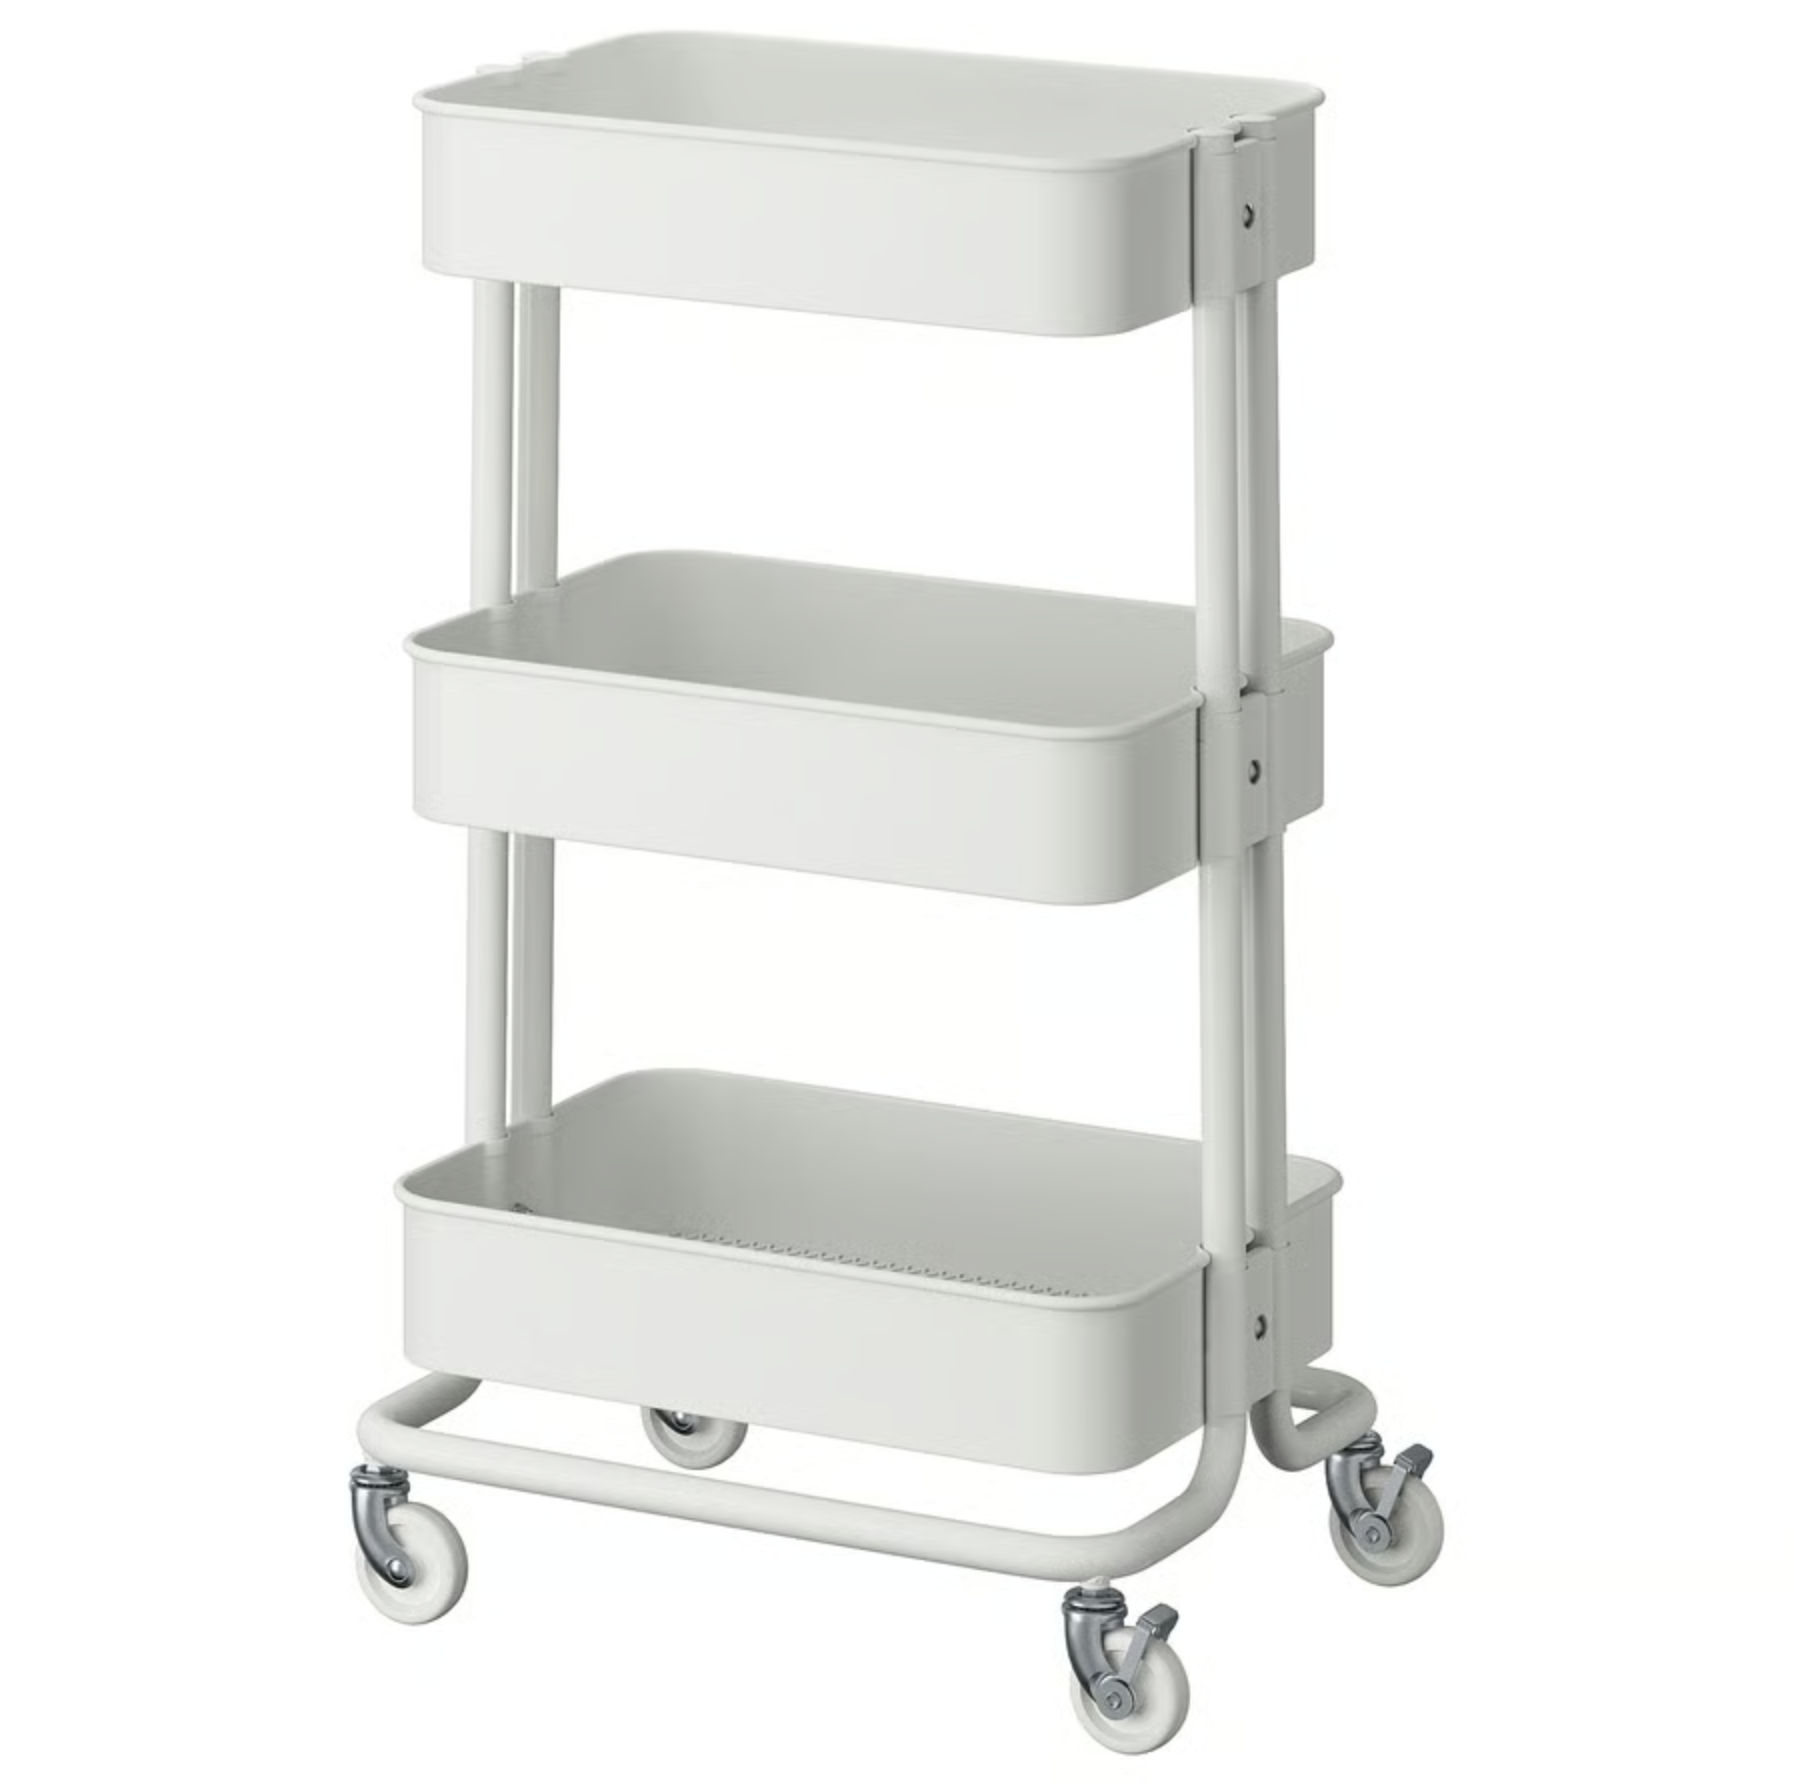
The reason why I design it without a base at this corner is because corner are often hard to reach. Although there are accessories that tackle the storage for corner places, it also depends on the shape and size of the corner. The intent is to store items on a trolley like the IKEA RÅSKOG trolley.
You can also buy accessories. Jishang's team mainly recommend Higold — they carry it with them, so you can actually purchase it through them. I purchased my kitchen sink, kitchen tap, and my shoe rack with them.
I came across CookTimeas well. This is quite popular, but unfortunately they don't carry it. Typically, you can actually buy it off Taobao, but make sure you have the measurement ready because it has to fit into your carpentry and then get a local installer to install it. As for the installation charges, you probably need to ask the installer how they charge — it varies a lot. I am in the midst of getting quotes from different installers, and it's all different pricing. You just inquire.
Carpentry Ordering Process
After all the back and forth with the designer to decide on the look and feel, they will send a team down to take measurements to confirm the length, height, and depth of the carpentry at the places that you want to install. This is chargeable at S$100 and you will pay this measuring team directly. They will measure and send all the measurements to Jishang Team for them to come up with a detailed drawing. Which includes all the little details like how many drawers will be there, what kind of drawers, is it pull out etc.
The team taking measurement are also responsible for installation. However it is not mandatory to engage the same team. However, if you engage the same team, they will deduct that S$100 you paid for measurement. You are free to engage a different team. You can find your own installers. In fact, I think you can also do the measurement yourself. My friend did that when he engaged the designer through Rednote.
Once you are satisfied with the detailed drawing, you need to pay 50% of the total price, and then they will start manufacturing. Manufacturing will take around 25 to 30 days, after which you will need to pay the balance and they will ship it out to your shipper. They will recommend a couple of them, but you can also search on the Taobao Addicts Facebook group on Facebook. I found mine through that. EKLink was also a popular option being mentioned on the Facebook group. Just search 3PF on the group and you will see people recommending. After they reach the warehouse, it will take around 10 to 12 days for sea shipping. After it reaches your place, installation usually takes maybe four to six days, depending on the number of items and how big your project is.
What's next
Install through Days 3 and 4 — Saturday scaffold and TV wall; Monday kitchen carcasses, entrance shoe cabinet doors on. Write-ups: Day One, Days 3 and 4. Subscribe below if you want a ping — no spam.
China carpentry — chapters so far
Get the occasional reno note
New contacts, brands, and lessons from real renovations in Singapore — no spam, unsubscribe anytime.
More stories
The renovations before this one: